このUV4Lは現在自宅Router内で稼働しています。今回はRouterを越えて外からでもアクセス出来るようにします。
UV4Lには中継アプリが必要
自宅Router越えについてここを参照します。リンク先はWebRTでのRouter越えの例です。P2Pは通信を開始する前にお互いの情報を交換する必要が有ります。データの交換は通常簡単なサーバを介して行われますが、リンク先ではサーバを立てず、代わりにFirestoreを使用しています。お互いの情報をFirestoreに保存し、onSnapshot() メソッドを使いながら情報を交換しています。同じ様な処理をUV4Lでもと思いましたが、ちょっと問題なのがUV4Lが持っているサーバ(Sig_Serverと呼ぶ)です。Sig_ServerはUV4Lの情報交換用サーバです。UV4Lではこのサーバにサーバが要求するフォマットでコータを送る必要が有ります。Firestoreはデータの更新をClientに通知出来ますが、Sig_Serverの要求する形式でデータを送る事は出来ません。
Firestoreの詳細を読んで行くと、ある手順を踏めばユーザアプリからFirestoreにアクセス出来る事が分かりました。さたにアクセス出来る状態になれば、FirestoreからのonSnapshot() メソッドが使える事も分かりました。そこでこれらと中間サーバを使えばRouter外のClientからRouter内のSig_Serverへデータ送受信が出来るのではないかと気付きました。
- ClientからSig_Serverへのデータの送信
- ClientがFirebase内のHTMLを通してFirestoreにデータを保存
- onSnapshot() メソッドによりRaspberry PI内のアプリ(仮にServer)に更新を連絡。
- Serverは送られて来たデータを元にデータを変換し、Sig_Server送る。
- Sig_ServerからClientへのデータの送信
- Sig_ServerからServerにデータを送信。
- Serverは送られて来たデータを変換しFirestoreに保存
- onSnapshot() メソッドによりClientにデータが更新を連絡
現状のUV4L

- UV4L: FirestoreはSig_Serverが要求する形式でデータを送る事は出来ない。
考えているUV4L

- ClinetはFirebaseからメインのHTMLでFirestroeにアクセス可能。
- Firestoreにコレクション”uv4l”の中にドキュメント”client”, ”raspi” を作成。
- Raspberry PIにFirestoreにアクセス出来るサーバを上げる
- Client ー> UV4L
- HTMLを使いFirestoreにコレクション”uv4l”のドキュメント”client”にデータを書き込む
- ドキュメント”client”の更新はonSnapshot() メソッドによりRaspberry PIのServerに送られる
- Raspberry PIのServerはデータを変換してSig_Serverに送信する。
- UV4L ー> Client
- Sig_ServerがRaspberry PIのServerにデータを送る。
- Serverはこのデータを変換してFirestoreにコレクション”uv4l”のドキュメント”raspi”に書き込む
- ドキュメント”raspi”の更新はonSnapshot() メソッドによりHTML(Client)に送信される
先ずはFirestoreにpythonでアクセス
動作環境
今回使用するFirebase関係はここで説明しているものを使います。以降これと同等な環境がセットアップされているとして話を進めます。
- 1.プロジェクトの登録とHosting
- プロジェクトの登録と簡単はHTMLの公開
- 2.Authenticationの追加
- 許可されたClientのみアクセス可能とするにはこれを使います。
- 3.Cloud Firestoreの追加
- Firestoreの導入に関する説明。
また使用するプログラム言語は、LED等制御用にWebsocketサーバ(python)を上げているので、Pythonを使用します。
確認作業
Firestoreにpythonでアクセスするには下記の2つが必要です。
- SDKの追加
- 認証ファイルの用意
SDKの追加
pythonのSDKのインストールは下記コマンドで行います。
pip install firebase-admin
pip install google-cloud-firestore
認証ファイルの用意
認証ファイルはFirebase コンソールで下記で取得出来ます。
- プロジェクトの設定 ー> サービスアカウント ー> Firebase Admin SDK
- Firebase Admin SDK画面のAdmin SDK 構成スニペットでPythonを選択
- 新しい秘密鍵を生成ボタンを押せば認証ファイル(xxxx..json)がダウンロードされます

Firestoreにアクセス
この認証ファイルを元にPythonでFirestoreにアクセスする簡単は例は下記の通り。Raspberry PI側で以下のプログラムを実行します。
samp00.py
#!/usr/bin/env python3
import firebase_admin
from firebase_admin import credentials
from firebase_admin import firestore

import json
import threading
import time

cred = credentials.Certificate('xxxxxxxxxx.json')
firebase_admin.initialize_app(cred)
db = firestore.client()

db.collection("uv4l").document("client").set({"what": "none"})

# Create an Event for notifying main thread.
callback_done = threading.Event()
# Create a callback on_snapshot function to capture changes
def on_snapshot(doc_snapshot, changes, read_time):
    doc = doc_snapshot[0]
    print('client: ', json.dumps(doc.to_dict()))
    callback_done.set()

doc_ref = db.collection("uv4l").document("client")
# Watch the document
doc_watch = doc_ref.on_snapshot(on_snapshot)

while 1:
    time.sleep(0.1)
- Cloud Firestore にデータを追加する を参照しています。
- Cloud Firestore を初期化するー>各自のサーバーで初期化するを参照
- 必要なモジュールを2,3,4行で読み込む
- 10行:’xxxxxxxxxx.json’がダウンロードした認証ファイルです。ここでファイルを読み込んでいます
(認証ファイルは作業フォルダーに予め保存しておいて下さい) - 11行:firebase_adminの初期化
- Firestoreへの書き込み
- 12行:firestore.clientの作成
- 14行:ここでFirestoreへの書き込んでいます。
- このコマンドでFirestoreへ、コレクション”uv4l”, ドキュメント”client”, データ”what: none”と書き込まれます
- この時点でFirestoreは下記の様になります。

- Cloud Firestore を初期化するー>各自のサーバーで初期化するを参照
- onSnapshot() メソッドは Cloud Firestore でリアルタイム アップデートを入手する を参照
- 17行:
threadの作成 - 19から22行:
on_snapshot関数の定義。- ここでFirestoreから送られて来るデータを処理します。
- 今回は、送られて来たデータを”
client:”の後に表示しています。
- 24行:Firestore上のどの項目をonSnapshotするか指定。ドキュメントの”client”を指定しています。
これでドキュメントの”client”の更新がonSnapshotの対象になります。 - 26行:onSnapshotを送る関数を指定。def on_snapshot(doc_snapshot, changes, read_time):に設定
- 17行:
- 28,29行:空ループ
このプログラムをRaspberry PI側で実行しするとターミナルに

と表示されます。onSnapshot() メソッドは設定された時点での対象の状態を先ず返して来ます。プログラムは起動と同時にコレクション”uv4l”, ドキュメント”client”, データ”what: none”とFirestoreに書き込んでいます。つまりonSnapshot() メソッドが設定された時点のドキュメント”client”のデータは”what: none”で、それがRaspberry PIに送られて来ています。ちなみこの時点でのFirestoreを見ると

となっています。次にFirestore側でデータを変更して見ます。

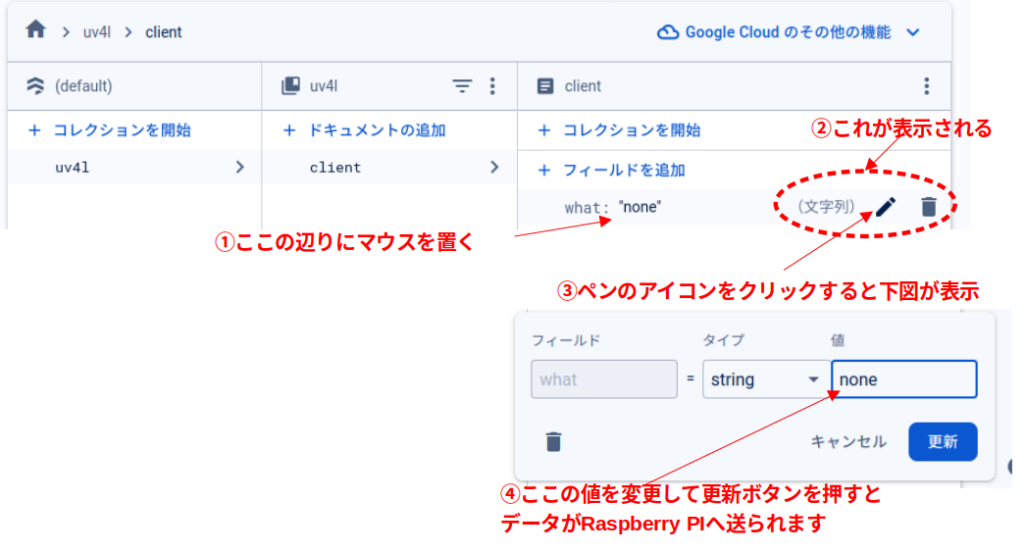
- マウスを”none”辺りに置くと
- これが表示されます。
- ペンアイコンをクリックすると
- データを編集出来ます。今回は”none”を”change”と書き換えて更新ボタンを押す。
以上でドキュメント”client”のデータ”none”が”change”に更新されました。この更新はonSnapshot() メソッドによりRaspbarry PIに送られます。Pythonプログラムは送られてきたデータを表示する様に設定しているのでターミナルに

と変更した値が表示されます。以上、”認証ファイル”があればユーザアプリからFirestoreにアクセス出来る事が確認出来ました。逆に言えば”認証ファイル”があれば誰でもFirestoreにアクセス出来る事になります。”認証ファイル”の管理は慎重に行って下さい。
Streaming出来るか?
HPをStreamingのスタート/ストップとStop、LEDのオン/オフ、P2P接続完了までの状態を表示するStateのみにして動作を確認するプログラムを製作します。

Firestoreにデータ交換用のドキュメント、”client”, “raspi”とLEDの状態(オン/オフ)を保存する”state”を作成して下記の様な構成にします。

これを実行するには下記のプログラムと操作が必要です。
- Raspberry PI側の中間サーバ
- Pythonで書かれた中間サーバ
- メインのHTML
- 上記HPを表示するHTML。これはFirebaseに保存します。
- Firestoreでのアクセス権の設定
- 今回は一時的に任意(誰でも)に設定しています。
- FirebaseでのDeploy
- HPが公開されます。
1.Raspberry PI側の中継サーバ
中継サーバはPythonで書いています。
server.py
#!/usr/bin/env python3
import websocket
import json
import threading
import firebase_admin
from firebase_admin import credentials
from firebase_admin import firestore
from gpiozero import LED

# Set Up led
led = LED(26)
led.off()

# Setup Firebase
cred = credentials.Certificate('xxxxxxxxxx.json')
firebase_admin.initialize_app(cred)
db = firestore.client()

db.collection("uv4l").document("client").set({"what": "none"})
db.collection("uv4l").document("raspi").set({"what": "none", "data": "none"})
db.collection("uv4l").document("state").set({"light": 0})

# Start server
flg_open = 0

# Create an Event for notifying main thread.
callback_done = threading.Event()
# Create a callback on_snapshot function to capture changes
def on_snapshot(doc_snapshot, changes, read_time):
    global flg_open, ws

    doc = doc_snapshot[0]
    print('client: ', json.dumps(doc.to_dict()))
    cmd = doc.to_dict()["what"]

    if cmd != 'none':
        if cmd == 'open':
            flg_open = 1

        elif cmd == 'close':
            if flg_open == 1:
                ws.close()

        elif cmd == 'light':
            if doc.to_dict()["data"] == 1:
                led.on()
            else:
                led.off()
            db.collection("uv4l").document("raspi").set({"what": "light", "data": doc.to_dict()["data"]})

        else:
            if flg_open == 1:
                ws.send(json.dumps(doc.to_dict()))

    callback_done.set()

doc_ref = db.collection("uv4l").document("client")
# Watch the document
doc_watch = doc_ref.on_snapshot(on_snapshot)

def on_message(ws, message):
    global db

    print(message)
    db.collection("uv4l").document("raspi").set(json.loads(message))

def on_error(ws, error):
    print(error)

def on_close(ws, close_status_code, close_msg):
    global flg_open, db

    print("### closed ###")
    flg_open = 0
    db.collection("uv4l").document("state").update({"signal": "none"})

def on_open(ws):
    global db

    print("Opened connection")
    db.collection("uv4l").document("state").update({"signal": "connect"})

a = 1
while a == 1:
    if flg_open == 1:
        ws = websocket.WebSocketApp("ws://raspberry.local:8090/stream/webrtc",
                          on_open=on_open,
                          on_message=on_message,
                          on_error=on_error,
                          on_close=on_close)

        ws.run_forever()
- 5〜7行: Firebase Firestoreにアクセスする為に必要はImport
- 8行: LED制御用のImport
- 15行: 認証ファイルの読み込み
- 16行: Firebaseの初期化
- 17行: Firestoreアクセス用インスタンスの作成
- 19〜21行: Firestoreに初期値を書き込む
- 27行: Threadの作成
- 57行: O
n_snapshotのWatchする場所を定義(コレクション “uv4l”,ドキュメント “client”) - 59行: O
n_snapshotが発生した時に実行する関数名を定義 - 29〜55行: O
n_snapshotが発生した時に実行する関数を定義
Firestoreのドキュメント “client”の内容が更新されるとこの関数が実行される
Serverが行う作業
37行: ”open” UV4LのSig_Serverに接続
40行: ”close” UV4LのSig_Serverと切断
44行: ”light” LEDのオンオフ。
51行: Firestoreの内容をエンコードしてSig_Serverに送信 - 86行: Serverの宣言。実はwebsocketのclientとして宣言
Serverの機能はOn_snapshot関数で代用 - 61行: UV4LのSig_Serveからメッセージが来るとここが実行される。
ここではデータをデコードしてドキュメント “raspi”に書き込む
2.メインのHTML
管理HPには3つのファイル”index.html”、”intercom_01a.js”、”intercom.css”が必要です。これらのファイルはFirebaseの作業Directoryのpublicフォルダーに保存します。”index.html”、”intercom_01a.js”は下記の様に変更します。(”intercom.css”は変更有りません)
index.html
HPのHTML部分です。8,9,10行がFirebaseを使用するために必要な部分です。
index.html
<!DOCTYPE html>
<html>
    <head>
        <meta charset="UTF-8">
        <link rel='stylesheet' type='text/css' href='./intercom.css' >
        <title>UV4L WebRTC</title>

        <script src="/__/firebase/10.9.0/firebase-app-compat.js"></script>
        <script src="/__/firebase/10.9.0/firebase-firestore-compat.js"></script>
        <script src="/__/firebase/init.js?useEmulator=true"></script>


    </head>

    <body>
        <div class='b_frame'>
   	        <div class='t_font'><u>UV4L WebRTC 1.0</u></div>

            <div class='p_frame'>
                <video id="remote-video" autoplay="" width="640" height="480"> </video>
                <video id="play-video" controls style='display:none'>Your browser does not support the video tag.</video>
            </div>

            <div class="_menu">
               <div class="input-group">
                    <label>Stream</label>
       	            <button type='button' id='start' onclick='start();'>Start</button>
                    <button type='button' id='stop' onclick="stop();">Stop</button><br>
                    <label>TEST</label>
                    <button type='button' id='bt_LED' onclick='bt_led();'>LED_OFF</button>
                    <br><label>State</label>
                    <label style="margin: 0 0 0 0" id='_state'>...</label><br>

                   <canvas style='display:none'></canvas>
                </div>
            </div>
        </div>

        <script src='./intercom_01a.js'></script>
    </body>
</html>
intercom_01a.js
Javascript部分です。
intercom_01a.js
var ws = null;
var pc;
var audio_video_stream;
var aa_streams = [];
var mediaConstraints = {
     optional: [],
     mandatory: {
         OfferToReceiveAudio: true,
         OfferToReceiveVideo: true
     }
};
var iceCandidates = [];
var remoteVideo = document.getElementById("remote-video");

var pcConfig = {/*sdpSemantics : "plan-b"*,*/ "iceServers": [
    {"urls": ["stun:stun1.l.google.com:19302", "stun:stun2.l.google.com:19302"]}
]};

set_Btn('stop', 0);

const db = firebase.firestore();
db.collection("uv4l").doc("raspi").set({what: "none", data: "none"});
document.getElementById("_state").innerHTML = "Ready";

async function busy_check(check_data) {
    var flg = 1;
    while(flg) {
        var flg_st = await db.collection("uv4l").doc("state").get();
        var flg_state = flg_st.data();
        if(flg_state.signal == check_data) flg = 0;
        console.log('state:', flg_state.signal);
    }
}

const _message = db.collection('uv4l').doc('raspi');
_message.onSnapshot(
    (sshot) => {
    var msg = sshot.data();
    var what = msg.what;
    var data = msg.data;
    console.log("message =" + what);
    switch(what)
    {
        case "offer":
                document.getElementById("_state").innerHTML = "Get Offer";
                pc.setRemoteDescription(new RTCSessionDescription(JSON.parse(data)),
                    function onRemoteSdpSuccess() {
                        remoteDesc = true;
                        addIceCandidates();
                        console.log('onRemoteSdpSucces()');
                        pc.createAnswer(function (sessionDescription) {
                            pc.setLocalDescription(sessionDescription);
                            var request = {
                                what: "answer",
                                data: JSON.stringify(sessionDescription)
                            };
                            db.collection("uv4l").doc("client").set(request);
                            console.log(request);
                        }, function (error) {
                            alert("Failed to createAnswer: " + error);
                        }, mediaConstraints);
                    },
                    function onRemoteSdpError(event) {
                        alert('Failed to set remote description (unsupported codec on this browser?): ' + event);
                        stop();
                    }
                );
                break;

        case "iceCandidate": // when trickle is enabled
                document.getElementById("_state").innerHTML = "Get IceCandidate";
                if (!data) {
                    console.log("Ice Gathering Complete");
                    document.getElementById("_state").innerHTML = "Ice Gathering Complete";
                    break;
                }
                var elt = JSON.parse(data);
                let candidate = new RTCIceCandidate({sdpMLineIndex: elt.sdpMLineIndex, candidate: elt.candidate});
                iceCandidates.push(candidate);
                if (remoteDesc)
                    addIceCandidates();
                document.documentElement.style.cursor = 'default';
                break;

        case "iceCandidates":
                document.getElementById("_state").innerHTML = "Get IceCandidates";
                var candidates = JSON.parse(msg.data);
                for (var i = 0; candidates && i < candidates.length; i++) {
                    var elt = candidates[i];
                    let candidate = new RTCIceCandidate({sdpMLineIndex: elt.sdpMLineIndex, candidate: elt.candidate});
                    iceCandidates.push(candidate);
                }
                if (remoteDesc) addIceCandidates();
                document.documentElement.style.cursor = 'default';
                break;

        case "light":
                if(data) {
                    document.getElementById("bt_LED").textContent = 'LED_ON'
                    document.getElementById("bt_LED").style.backgroundColor = 'red';
                }
                else {
                    document.getElementById("bt_LED").textContent = 'LED_OFF'
                    document.getElementById("bt_LED").style.backgroundColor = "#228b22";
                }
                break;

    }
});

async function bt_led(){
    var _temp = await db.collection("uv4l").doc("state").get();
    _temp = _temp.data();
    var data = ! _temp.light;
    await db.collection("uv4l").doc("state").update({light: data});
    await db.collection("uv4l").doc("client").set({what: "light", data: data});
}

function createPeerConnection() {
     try {
         pc = new RTCPeerConnection(pcConfig);
         pc.onicecandidate = onIceCandidate;
         pc.ontrack = onTrack;
         pc.onremovestream = onRemoteStreamRemoved;
         console.log("peer connection successfully created!");
         document.getElementById("_state").innerHTML = "Peer Connection Successfully created!";
    } catch (e) {
         console.error("createPeerConnection() failed");
     }
 }

 async function onIceCandidate(event) {
     if (event.candidate && event.candidate.candidate) {
         var candidate = {
             sdpMLineIndex: event.candidate.sdpMLineIndex,
             sdpMid: event.candidate.sdpMid,
             candidate: event.candidate.candidate
         };
         var request = {
             what: "addIceCandidate",
             data: JSON.stringify(candidate)
         };
         await db.collection("uv4l").doc("client").set(request);
     } else {
         console.log("End of candidates.");
         document.getElementById("_state").innerHTML = "End of candidates.";
     }
 }

 function addIceCandidates() {
     iceCandidates.forEach(function (candidate) {
         pc.addIceCandidate(candidate,
             function () {
                 console.log("IceCandidate added: " + JSON.stringify(candidate));
             },
             function (error) {
                 console.error("addIceCandidate error: " + error);
             }
         );
     });
     iceCandidates = [];
 }

 function onTrack(event) {
     console.log("Remote track!");
     var remoteVideoElement = document.getElementById('remote-video');
     remoteVideoElement.srcObject = event.streams[0];
     aa_streams[0] = event.streams[0];
     set_Btn('stop', 1);
 }

 function onRemoteStreamRemoved(event) {
     var remoteVideoElement = document.getElementById('remote-video');
     remoteVideoElement.srcObject = null;
     remoteVideoElement.src = ''; // TODO: remove
 }

async function start() {
     set_Btn('start', 0);
     document.getElementById("stop").disabled = false;
     document.getElementById("start").disabled = true;
     document.documentElement.style.cursor = 'wait';

     db.collection("uv4l").doc("client").set({what: "open"});
     document.getElementById("_state").innerHTML = "Opening Signal Server!";
     await busy_check("connect");
     document.getElementById("_state").innerHTML = "Opened.";

   // Initialize Cloud Firestore and get a reference to the service

     iceCandidates = [];
     remoteDesc = false;
     createPeerConnection();
     var request = {
             what: "call",
             options: {
                 force_hw_vcodec: false,
                 vformat: "30",
                 trickle_ice: true
             }
     };

     db.collection("uv4l").doc("client").set(request);
     document.getElementById("_state").innerHTML = "Send Call";
}

async function stop() {
     set_Btn('stop', 0);
     set_Btn('start', 1);

     if (audio_video_stream) {
         try {
             if (audio_video_stream.getVideoTracks().length)
                 audio_video_stream.getVideoTracks()[0].stop();
             if (audio_video_stream.getAudioTracks().length)
                 audio_video_stream.getAudioTracks()[0].stop();
             audio_video_stream.stop(); // deprecated
         } catch (e) {
             for (var i = 0; i < audio_video_stream.getTracks().length; i++)
                 audio_video_stream.getTracks()[i].stop();
         }
         audio_video_stream = null;
     }
     document.getElementById('remote-video').srcObject = null;
     document.getElementById('remote-video').src = ''; // TODO; remove
     if (pc) {
         pc.close();
         pc = null;
         db.collection("uv4l").doc("client").set({what: "close"});
         await busy_check("none");
         document.getElementById("_state").innerHTML = "Close Signal Server!";
      }
     document.getElementById("stop").disabled = true;
     document.getElementById("start").disabled = false;
     document.documentElement.style.cursor = 'default';
 }

 function set_Btn(_id, flg) {
     var flg_able = true;
     var flg_back = "gray";
     if(flg){
         flg_able = false;
         flg_back = "#228b22";
     }
     document.getElementById(_id).disabled = flg_able;
     document.getElementById(_id).style.backgroundColor = flg_back;
 }
- 21行: Firestore使用の為のインスタンスを宣言
- 22行: ドキュメント”raspi”に初期値を記入
- 35行: On_snapshot。対象を”raspi”に指定
- 36〜109行: On_snapshotの処理。
- Raspberry PIがFirestoreのドキュメント”raspi”に値を保存するとOn_snapshot機能によりここに通知されます。
- ここでは送られて来たコマンドの処理をします。各コマンドは
- “offer”: Sig_ServerからのP2P関係情報を中間Serverが変換したデータ。
データ処理後、自身のP2P関係の情報を ドキュメント”client”に書き込んでSig_Serverに送信 - “iceCandidate”, “iceCandidates”: Sig_ServerからのP2P接続用のデータの交換方式。
"light": Raspberry PIのLEDのオンオフコマンド。
中間サーバがドキュメント”state”に状態を保存すると共に”client”にこのコマンドでLEDの
変化を知らせる
- “offer”: Sig_ServerからのP2P関係情報を中間Serverが変換したデータ。
- 178行: Startボタンを押すとここが実行
- 184行:ドキュメント”client”に”open”コマンドを保存。
On_snapshot機能を通してRaspberry PIの中継Serverに”open”コマンドが送られる。 - 186行:ここでRaspberry PIのServerの処理完了を待って
- 203行:”client”に”call”データを書いてSig_Serverにデータを送信する。情報交換開始。
- 184行:ドキュメント”client”に”open”コマンドを保存。
3.Firestoreでのアクセス権の設定
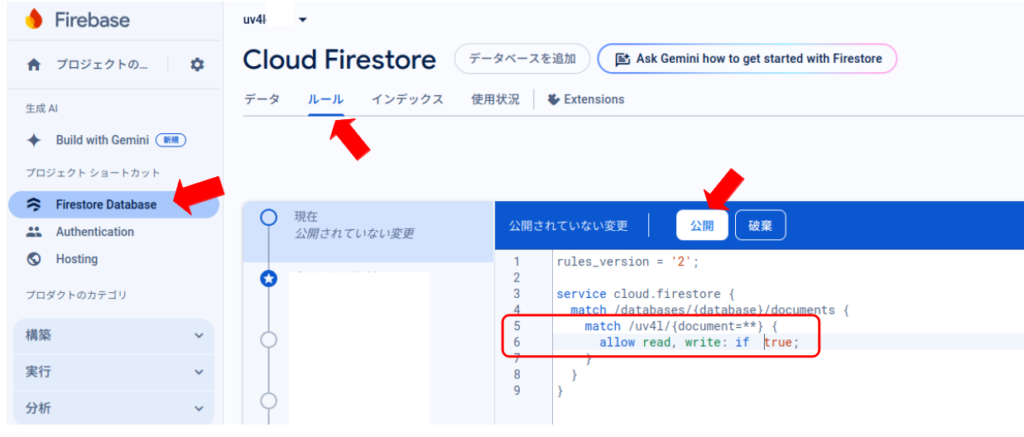
最終的には承認されたClientのみアクセス出来る様に設定しますが、今回はSteramingの確認を行いたいので取り敢えず一時的に対象のコレクション”uv4l”に誰でもアクセス出来る設定にします。Firebaseコンソールで下記を行って下さい。
- Firestore ー> ルールタブに移動
- 設定情報を編集
- 5行: 対象のコレクションを指定。今回は”uv4l”
- 6行: これで誰でもアクセス可能となる。
- 最後に公開ボタンを押すと設定が有効になる。

この設定はFirestoreでは安全で無い設定とされています。確認が済んだらこの設定を解除して下さい
4.FirebaseでのDeploy
PCのモニターを上げ、Firebaseの作業ディレクトリ ./firebase/uv4l に移動して firebase deploy を実行します。すると下記がモニターに表示されます。
monitor
/firebase/uv4l$ firebase deploy

=== Deploying to 'uv4l'...

i  deploying firestore, hosting
i  firestore: reading indexes from firestore.indexes.json...
i  cloud.firestore: checking firestore.rules for compilation errors...
✔  cloud.firestore: rules file firestore.rules compiled successfully
i  firestore: deploying indexes...
✔  firestore: deployed indexes in firestore.indexes.json successfully for (default) database
i  firestore: uploading rules firestore.rules...
i  hosting[uv4l]: beginning deploy...
i  hosting[uv4l]: found 32 files in public
✔  hosting[uv4l]: file upload complete
✔  firestore: released rules firestore.rules to cloud.firestore
i  hosting[uv4l]: finalizing version...
✔  hosting[uv4l]: version finalized
i  hosting[uv4l]: releasing new version...
✔  hosting[uv4l]: release complete

✔  Deploy complete!

Project Console: https://console.firebase.google.com/project/uv4l/overview
Hosting URL: https://uv4l.web.app
/firebase/uv4l$
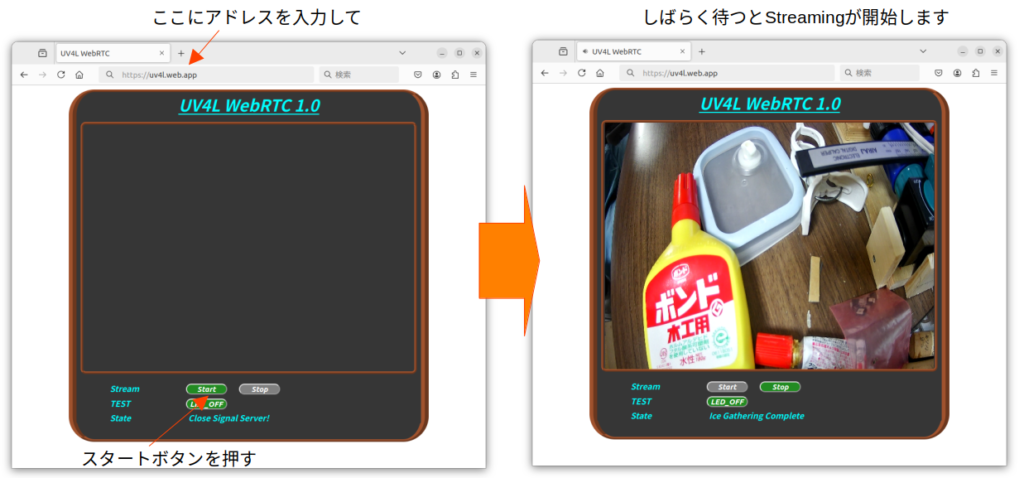
24行:”Hosting URL: https://uv4l.web.app”が公開されたURLです。Webブラウザー(FireFoxを使用しています)を上げてブラウザーのURL欄にこのアドレスを入力すると下記左の様にHPが表示されます。HPのStartボタンを押すと

HPのStateの欄にいくつかメッセージを表示され、最後の右の図の様にStreamingが始まります。
HPのDeploy(公開)の中止は、Firebase作業用ディレクトリーで firebase hosting:disable を実行します。このコマンドを実行すると、モニターに下記が表示されます。
monitor
/firebase/uv4l$ firebase hosting:disable
? Are you sure you want to disable Firebase Hosting for the site uv4l
This will immediately make your site inaccessible! Yes
✔  Hosting has been disabled for uv4l. Deploy a new version to re-enable.
/firebase/uv4l$
3行目でアクセスを中断するか聞かれますが、デフォルトの”Y”を選択して下さい。これでHPの公開は中止されます。
次回は
今回はFirebase(Firestore)を使用してRaspberry PIで稼働している”UV4L”にRouterの外からアクセス出来る事が分かりました。次回はHPにカメラを操作する機能等を実装して最終形を目指します。