今回はSpriteに付いてです。そもそもSpriteとは、メモリ領域に定義された画像データを一気にLCDに書き込むものです。イメージ的にはスタンプを押す様に描画すると言ったところでしょうか。
特徴は、
- 描画が速い。
- 表示時に画面のチラツキが少ない。
- 同じ画像を角度または拡大縮小等の処理を加えて瞬時に描画出来る等。
/TFT_eSPI/examples/Sprite/Rotated_Sprite_1/Rotated_Sprite_1.ino
簡単なSpriteのデモです。定義した画像データを角度をつけて表示しています。デモの最初の部分を実行するとこんな感じでLCDに表示されます。
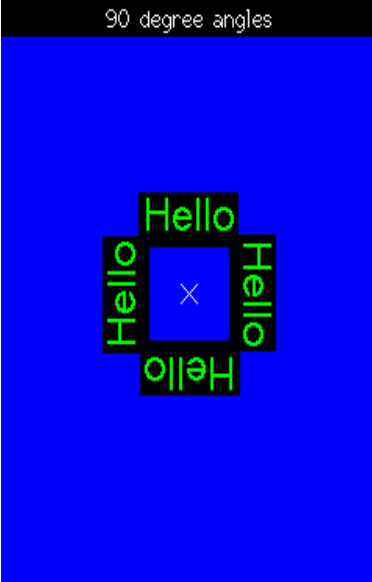
この部分のコードは以下の通り。
#include <TFT_eSPI.h>

TFT_eSPI tft = TFT_eSPI();           // TFT object

TFT_eSprite spr = TFT_eSprite(&tft); // Sprite object

// =======================================================================================
// Setup
// =======================================================================================

void setup()   {
  Serial.begin(250000); // Debug only

  tft.begin();  // initialize
  tft.setRotation(0);
}

// =======================================================================================
// Loop
// =======================================================================================

void loop() {

  int xw = tft.width()/2;   // xw, yh is middle of screen
  int yh = tft.height()/2;


  showMessage("90 degree angles");
  tft.setPivot(xw, yh);     // Set pivot to middle of TFT screen
  drawX(xw, yh);            // Show where screen pivot is

  // Create the Sprite
  spr.setColorDepth(8);      // Create an 8bpp Sprite of 60x30 pixels
  spr.createSprite(64, 30);  // 8bpp requires 64 * 30 = 1920 bytes
  spr.setPivot(32, 55);      // Set pivot relative to top left corner of Sprite
  spr.fillSprite(TFT_BLACK); // Fill the Sprite with black

  spr.setTextColor(TFT_GREEN);        // Green text
  spr.setTextDatum(MC_DATUM);         // Middle centre datum
  spr.drawString("Hello", 32, 15, 4); // Plot text, font 4, in Sprite at 30, 15

  spr.pushRotated(0);
  spr.pushRotated(90);
  spr.pushRotated(180);
  spr.pushRotated(270);

delay(2000);- 3行:TFT_eSPI tft = TFT_eSPI(); TFT用の object
- LCDに描写する時に使用。
- 5行:FT_eSprite spr = TFT_eSprite(&tft); Sprite用の object
- Sprite領域内の作業に使用する。ー>ここに画像を描写してもLCDには表示されない。
- 29行:tft.setPivot(xw, yh); Sprite回転時の回転中心を指定
- 原点は画面の左上隅
- objectが tft である事が注意。( spr では無い)
- 32から40行でSprite Dataを作成しています。
- 33行:spr.setColorDepth(8); 1ドットの色データを作成。これで8ビットカラー
- 34行:spr.createSprite(64, 30); Spriteの大きさを幅64x30ビットに設定
- 33,34行から このSprite作成に64x30x8÷8=1920バイト必要。
- 35行:spr.setPivot(32, 55); Sprite側に回転中心。
- 原点はSpriteの左上隅
- こちらはobjectが spr。
- 29行のLCD側の回転中心にSpriteの回転中心を重ねて回転させる様です。
- 36から40行 Spriteのバックを黒で塗り、Sprite領域に緑色で”Hello”と表示
- 42から45行: Spriteを0,90,180,270度回転させています。

Spriteの作成先ですが、ESP32がPSRAMを持っていればそこに、持っていなければメモリー領域に作成されます。
回転中心の設定の仕方によってはこんな表示もできる様です。
Spriteは画像の表示のみと思っていました。でもこの様に文字列を書き込んだSprite を作成し、それを角度を付けて表示するれば角度を付けた文字列表示が可能になる事に気付きました。
/TFT_eSPI/examples/Sprite/Sprite_scroll_16bit/Sprite_scroll_16bit.ino
虹色の帯の上を文字列が横にスクロールするデモです。
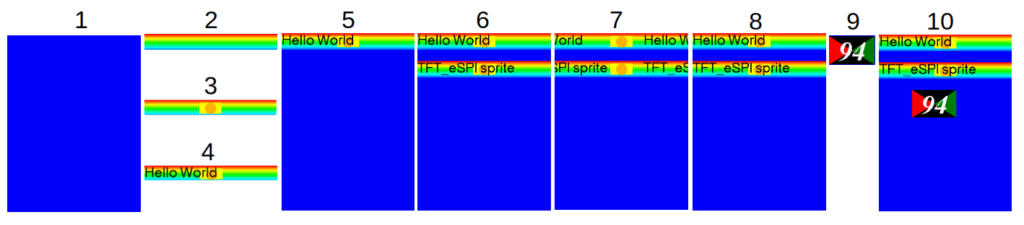
- バックを青く塗り潰す
- img.createSprite(IWIDTH, IHEIGHT);でSpriteを作成し虹の帯を描画
- Spriteの中心に絵を描画
- Spriteに”Hello World”と表示
- 作成したSpriteをLCD上部に表示
- 2,3,4(4では”TFT_eSPI sprite”)を実行して2つ目のSpriteを作成し下段に表示
- 文字列を横にスクロール
- スクロール完了
- 新たに箱と文字のSprtieを作成して
- LCDに表示
横スクロールはvoid build_banner(String msg, int xpos)が処理しています
void build_banner(String msg, int xpos)
void build_banner(String msg, int xpos)
{
  int h = IHEIGHT;

  // We could just use fillSprite(color) but lets be a bit more creative...

  // Fill with rainbow stripes
  while (h--) img.drawFastHLine(0, h, IWIDTH, rainbow(h * 4));

  // Draw some graphics, the text will apear to scroll over these
  img.fillRect  (IWIDTH / 2 - 20, IHEIGHT / 2 - 10, 40, 20, TFT_YELLOW);
  img.fillCircle(IWIDTH / 2, IHEIGHT / 2, 10, TFT_ORANGE);

  // Now print text on top of the graphics
  img.setTextSize(1);           // Font size scaling is x1
  img.setTextFont(4);           // Font 4 selected
  img.setTextColor(TFT_BLACK);  // Black text, no background colour
  img.setTextWrap(false);       // Turn of wrap so we can print past end of sprite

  // Need to print twice so text appears to wrap around at left and right edges
  img.setCursor(xpos, 2);  // Print text at xpos
  img.print(msg);

  img.setCursor(xpos - IWIDTH, 2); // Print text at xpos - sprite width
  img.print(msg);

}

- 0. 虹色の帯部をSpriteに描画。(コードの8から12行)
- 1. 文字列をStriteに描画。(コードの21,22 24,25行)
- 向かって右側の文字列が最初(21,22で)に次に左側(24,25で)が処理されます。
- 最初に処理された文字列はStripeの範囲外でStripeに描画されません。
- 先ずはこの状態でMain Loopの関数 img.pushSprite(0, 0); によって LCDに表示されます。
- 次にMain Loopの関数がXに位置をずらして build_banner()関数を呼びます。
- build_banner()では 0.を行い、次に文字列を描画するのですがXの位置により2. 3. 4.の状態になります。
- 最初の文字列処理、次の処理共にSpriteの範囲のみ描画されます。範囲外は無視
- 最後は文字列をーIWIDTH 移動させて終了。
- この一連の動作で文字列が左にスクロールしている様に見えます。
一般に表示欄より長い文字列を表示させたい時にスクロールを使います。今回の表示欄は240ドット。表示する文字列を”Hello World Scroll Sample”とすると文字列の長さは317ドットになります。以下の様にコードを書き換えれば表示欄より長い文字列もスクロールさせる事が出来ます。
Sprite_scroll_long.ino
#define IWIDTH  240
#define IHEIGHT 30

// Pause in milliseconds to set scroll speed
#define WAIT 10

#include <TFT_eSPI.h>                 // Include the graphics library (this includes the sprite functions)

TFT_eSPI    tft = TFT_eSPI();         // Create object "tft"

TFT_eSprite img = TFT_eSprite(&tft);  // Create Sprite object "img" with pointer to "tft" object
//                                    // the pointer is used by pushSprite() to push it onto the TFT

// -------------------------------------------------------------------------
// Setup
// -------------------------------------------------------------------------
void setup(void) {
  Serial.begin(115200);
  tft.init();
  tft.setRotation(0);
  tft.fillScreen(TFT_BLUE);
}

// -------------------------------------------------------------------------
// Main loop
// -------------------------------------------------------------------------
void loop() {
  int str_len, pos;
  String str;

  img.createSprite(IWIDTH, IHEIGHT);
  img.setTextSize(1);           // Font size scaling is x1
  img.setTextFont(4);           // Font 4 selected
  img.setTextColor(TFT_BLACK);  // Black text, no background colour
  img.setTextWrap(false);       // Turn of wrap so we can print past end of sprite

  str = "Hello World Scroll Sample";
  Serial.println("length: " + String(str_len));
  str += "     ";
  str_len = img.textWidth(str);
  Serial.println("length: " + String(str_len));

  while (1){
    for (pos = 0; pos > - str_len ; pos --){
      build_banner(str, pos, str_len + pos);
      img.pushSprite(0, 0);
      delay(WAIT);
    }
  }
}

// #########################################################################
// Build the scrolling sprite image from scratch, draw text at x = xpos
// #########################################################################

void build_banner(String msg, int xpos, int xpos1)
{
  img.fillRect  (0,0,IWIDTH,IHEIGHT,TFT_ORANGE);
  img.setCursor(xpos, 2);  // Print text at xpos
  img.print(msg);

  img.setCursor(xpos1, 2); // Print text at xpos - sprite width
  img.print(msg);
}
/TFT_eSPI/examples/Sprite/Rotated_Sprite_2/Rotated_Sprite_2.ino
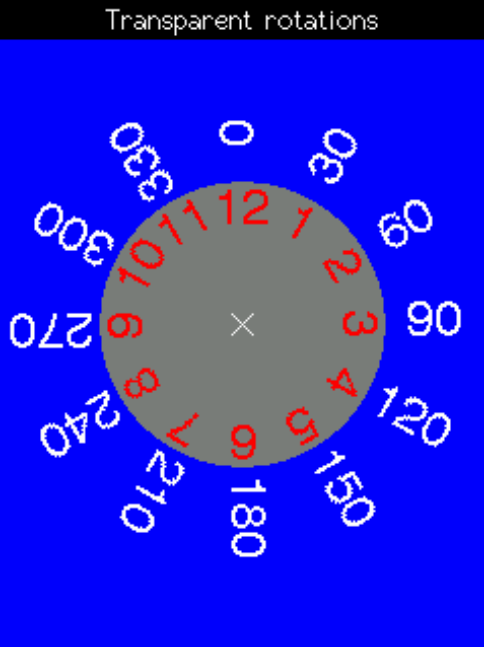
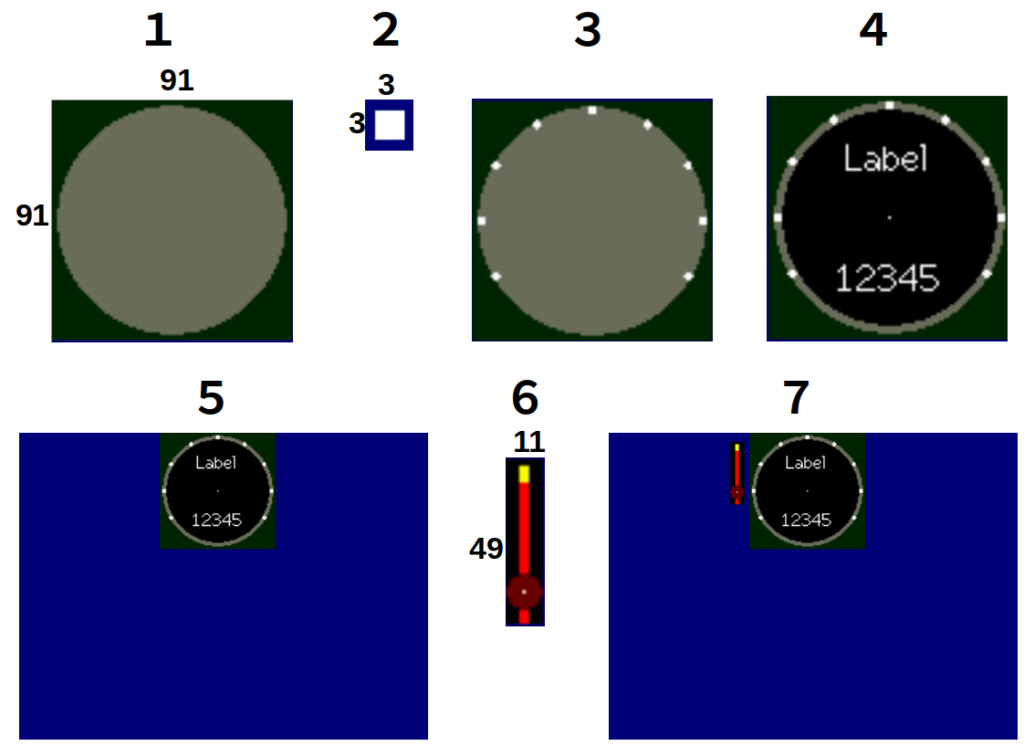
スピードメータの様にメータの針と値が表示されるデモです。
- ダイアル用Spriteの土台をdial.createSprite(91, 91)で作成
- 目盛り用Spriteをneedle.createSprite(3, 3);で作成
- ダイアル用Spriteに目盛り用Spriteを書き込む。(SpriteにSpriteを書き込む)
- 書き込む関数は、needle.pushRotated(&dial, angle);
- Spriteに書き込む時は、関数の第1引数に書き込み側のSpriteのポインタを指定
- ダイアル用Spriteの内側を描写してダイヤル用Sprite の完成。
- LCDのこの位置にダイアル用Spriteの内側を描写。
- 針用Spriteの作成
- 針用SpriteをLCDに表示
次は、このダイアル用Spriteと針用Spriteを用いて針を動かします。
- ダイアル用Spriteに針用Spriteを0の角度になるよう傾けて描写したものをLCDの左上に表示
- 関数 dial.pushSprite(x, y, TFT_TRANSPARENT); で第3引数で色データを渡すと
その色を透明扱いにします。 - 元のSpriteは四角のエリアに書かれていますが、LCDに表示されたSpriteはTFT_TRANSPARENT
色の部分の色が透明になっています。
- 関数 dial.pushSprite(x, y, TFT_TRANSPARENT); で第3引数で色データを渡すと
- 針を回して
- 240まで回転したらまた0に戻します。
- 針のStripeを直接LCDに表示(角度は12時の方向)
- 針を回して
- 一周して終了
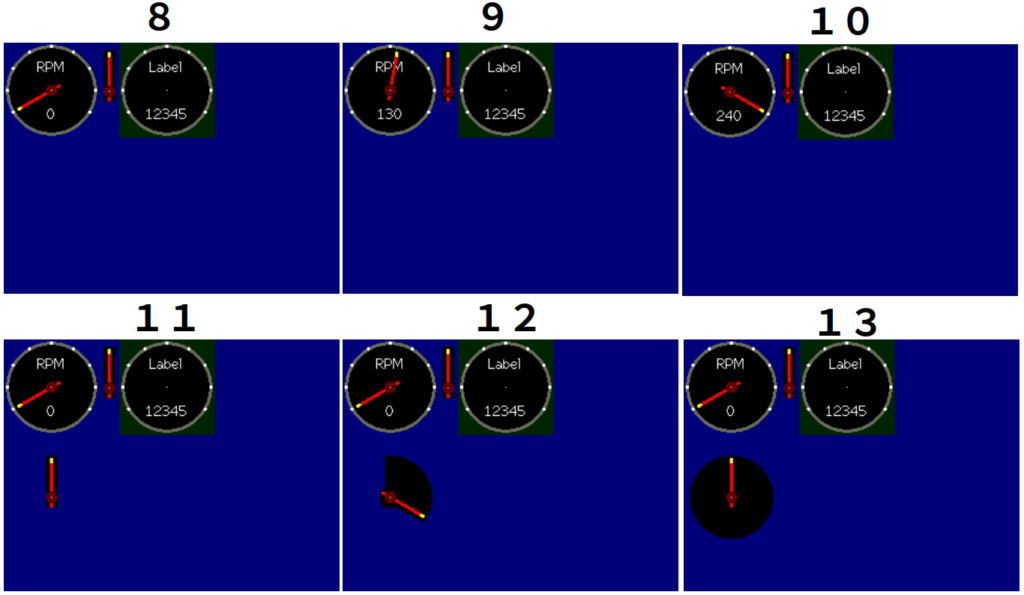
このデモはSpriteの中にSpriteを描く(透明色も含めて)デモでした。
/TFT_eSPI/examples/Sprite/Sprite_TFT_Rainbow/Sprite_TFT_Rainbow.ino
虹色のバックの色が綺麗に変わるデモです。

キーの部分はここ
    // Colour changing state machine
    for (int i = 0; i < 160; i++) {
      img.drawFastVLine(i, 0, img.height(), colour);
      switch (state) {
        case 0:
          green += 2;
          if (green == 64) {
            green = 63;
            state = 1;
          }
          break;
        case 1:
          red--;
          if (red == 255) {
            red = 0;
            state = 2;
          }
          break;
        case 2:
          blue ++;
          if (blue == 32) {
            blue = 31;
            state = 3;
          }
          break;
        case 3:
          green -= 2;
          if (green == 255) {
            green = 0;
            state = 4;
          }
          break;
        case 4:
          red ++;
          if (red == 32) {
            red = 31;
            state = 5;
          }
          break;
        case 5:
          blue --;
          if (blue == 255) {
            blue = 0;
            state = 0;
          }
          break;
      }
      colour = red << 11 | green << 5 | blue;
    }
w=160、h=128のSpriteを定義し、この領域で関数 img.drawFastVLine(i, 0, img.height(), colour); で縦方向に160本色を変えて線を書いています。書き終わったSpriteをLCDに表示しているのですが、バックの虹色が綺麗に変わって行きます。ちょっとしたアニメーションにも見えます。
次回は
次回は日本語表示に付いてです。