Raspberry PiのHTTPServerにスマホ等からアクセスしRaspberry PIをコントロールする事はよく有ります。この場合、Raspberry PIのネットへの接続として下記の2つが有ります。
- STA接続 : ルータを親機に子機としてRaspberry Piをつなぐ
- AP接続 : Raspberry Piが親機となりルータを通さずにとPC等と直接つながる
AP接続ではSSHが使えません。SSHが使えないとデスクトップをRaspberry PIに接続出来ずプログラムの開発に置いてかなり不便です。
そんな時、Wifiを切り替えてAP/STA接続する方法について説明しているページを見つけました。そのHPは ”AP-STA mode” です。Raspberry PiのWifiディバイスは、アクセスポイント(AP)とワイヤレスクライアント/ステーション(STA)の同時操作をサポートしていて1つのWifi機器でWi-Fi AP / STA同時に実行することが出来る様です。
必要なソフトのインストール
先ずOSのインストールをSTA接続で行います。次にAP接続用のソフト hostapd と dnsmasq をインストールします。
sudo apt install hostapd
sudo apt install dnsmasq
dhcpcd.confの設定
”AP-STA mode”によると、wlan0のコピーを作ってそれと切り替えながら、AP/STA接続を行う様です。先ずは、wlan0のコピー、”uap0” を /etc/dhcpcd.conf に追加します。/etc/dhcpcd.conf をエディタで開き、ファイルの最後に下記を追加します。
# RaspAP uap0 configuration
interface uap0
static ip_address=192.168.2.1/24
nohook wpa_supplicant
- static ip_address=192.168.2.1/24 :
- 現在使用しているルーターが、192.168.3.1/24 なのでそれを避けています。環境に合わせて変更して下さい。
- nohook wpa_supplicant:
- wpa_supplicantが
、wlan0 を指しているようで、これでwlan0と一緒に動くなとなる様です。
- wpa_supplicantが
hostapd.confの設定
hostapdの設定ファイルです。これちょっと難しいです。保存場所は、/etc/hostapd/hostapd.conf
/etc/hostapd/hostapd.conf
# RaspAP wireless client AP mode
interface=uap0
driver=nl80211
hw_mode=g
channel=1
ieee80211n=1
wmm_enabled=1
ht_capab=[HT40][SHORT-GI-20][DSSS_CCK-40]
auth_algs=1
wpa=2
wpa_key_mgmt=WPA-PSK
ssid=raspi-ap
wpa_passphrase=12345678
wpa_pairwise=CCMP
country_code=JP
- 注釈
- uap0についての記述
- ドライバーの指定。
- 利用する周波数帯。
- b:IEEE 802.11b
- g:IEEE 802.11g
- a:IEEE 802.11a
- 使用するチャンネル。すでにWifiを使っているようでしたら、nmcli で空いているチャンネルを確認
- ieee80211nを有効
- wmm_enabledを有効
- 認証アルゴリズム
- 0: 暗号化なし
- 1: WPA
- 2: WEP
- 3: 両方
- WPAのバージョンを設定
- 1: WPA
- 2: WPA2
- 3: 両方
- 利用する共有鍵認証の方式
- 使用するSSID。今回は、”raspi-ap”と指定
- 接続する際のパスワード。8文字以上必要。今回は、”12345678”と指定
- 国指定
ネットの環境によって指定値が変わります。nmcliを使いながら指定して下さい。このファイルをhostapdで使用する事を定義するために、/etc/default/hostapd を編集する必要が有ります。エディタでファイルを開いて下さい。
/etc/default/hostapd
# Defaults for hostapd initscript
#
# WARNING: The DAEMON_CONF setting has been deprecated and will be removed
#          in future package releases.
#
# See /usr/share/doc/hostapd/README.Debian for information about alternative
# methods of managing hostapd.
#
# Uncomment and set DAEMON_CONF to the absolute path of a hostapd configuration
# file and hostapd will be started during system boot. An example configuration
# file can be found at /usr/share/doc/hostapd/examples/hostapd.conf.gz
#
#DAEMON_CONF=""

# Additional daemon options to be appended to hostapd command:-
#       -d   show more debug messages (-dd for even more)
#       -K   include key data in debug messages
#       -t   include timestamps in some debug messages
#
# Note that -B (daemon mode) and -P (pidfile) options are automatically
# configured by the init.d script and must not be added to DAEMON_OPTS.
#
#DAEMON_OPTS=""
13行目の、#DAEMON_CONF=”” を DAEMON_CONF=”/etc/hostapd/hostapd.conf” と変更して保存。
また、hostapd はMASKされているので起動出来るようにunmaskし、起動時に自動で起動する様にします。
sudo systemctl unmask hostapd
sudo systemctl enable hostapd
dnsmasq.confの設定
dnsmasqの設定ファイルです。/etc/dnsmasq.confに有るのですが、これをバックアップし、新たにファイルを作ります。
sudo mv /etc/dnsmasq.conf /etc/dnsmasq.conf.org
sudo nano /etc/dnsmasq.conf
新たなファイルの内容は、
/etc/dnsmasq.conf
interface=lo,uap0               # Use interfaces lo and uap0
no-dhcp-interface=lo,wlan0
bind-interfaces
dhcp-range=192.168.2.2,192.168.2.255,12h
これで設定は終了です。
起動時uap0の追加と実行
”AP-STA mode”によると、uap0を起動時に追加と実行する必要が有るようです。実際の作業内容を以下に示します。
iw dev wlan0 interface add uap0 type __ap
ifconfig uap0 up
- 1行目、wlan0にuap0を type ap として追加。
- 2行目、uap0 の起動。
各サービスの起動順番
これで全ての準備が出来たのですが各サービの実行順を間違えると起動しません。
- uap0の追加とhostapd
- hostapdはAP接続用ソフトですから、uap0が出来た後に実行する必要が有ります。
- dnsmasq
- これは、AP接続に対するネームサーバですので、hostapd の後に実行。
- uap0の追加
- OS立ち上げ時に自動で実行したいので、rc.local にスクリプトを追加
これらを元に /etc/rc.local を編集。下記は rc.local の一部です。rc.local の if と exit0の間にコードを追加します。
/etc/rc.local
# Print the IP address
_IP=$(hostname -I) || true
if [ "$_IP" ]; then
  printf "My IP address is %s\n" "$_IP"
fi
sudo systemctl stop dnsmasq
sudo systemctl stop hostapd
sudo iw dev wlan0 interface add uap0 type __ap
sudo ifconfig uap0 up
sudo systemctl restart hostapd
sudo systemctl restart dnsmasq

exit 0
- dnsmasq と hostapdを止める
- uap0を追加して実行
- hostapdを先に実行して次にdnsmasqを実行。
これで設定は終了です。Raspberry Piをリブートして下さい。
検証
立ち上がったら、確認を行います。正しく設定されていればSSHでの接続が可能です。PCからSSHでRaspberry Pi に接続して下さい。ネットの構成を確認する為に ifconfig を行って下さい。
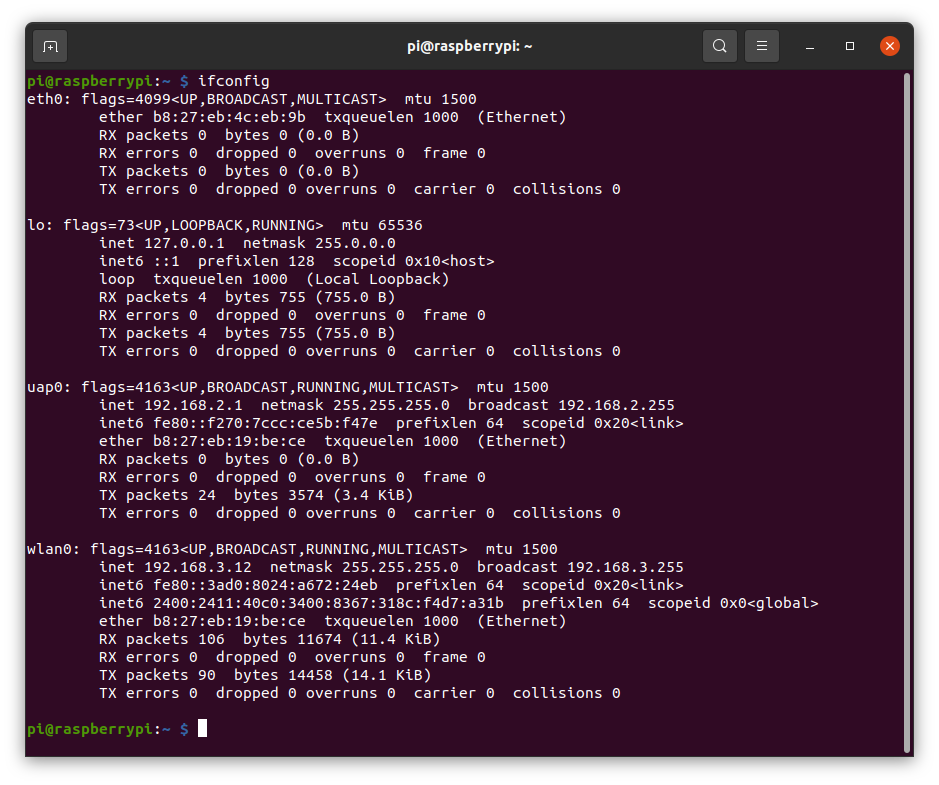
- wlan0 : IPアドレスが、192.16.8.3.12。これはルータに接続している。(STA接続)
- uap0 : IPアドレスが、192.168.2.1。こちらはAP接続。
SSHか動いていることから、wlan0は正しく動いている事が分かります。uap0の確認はスマホで行いました。スマホでWifiを検索する画面に行くと
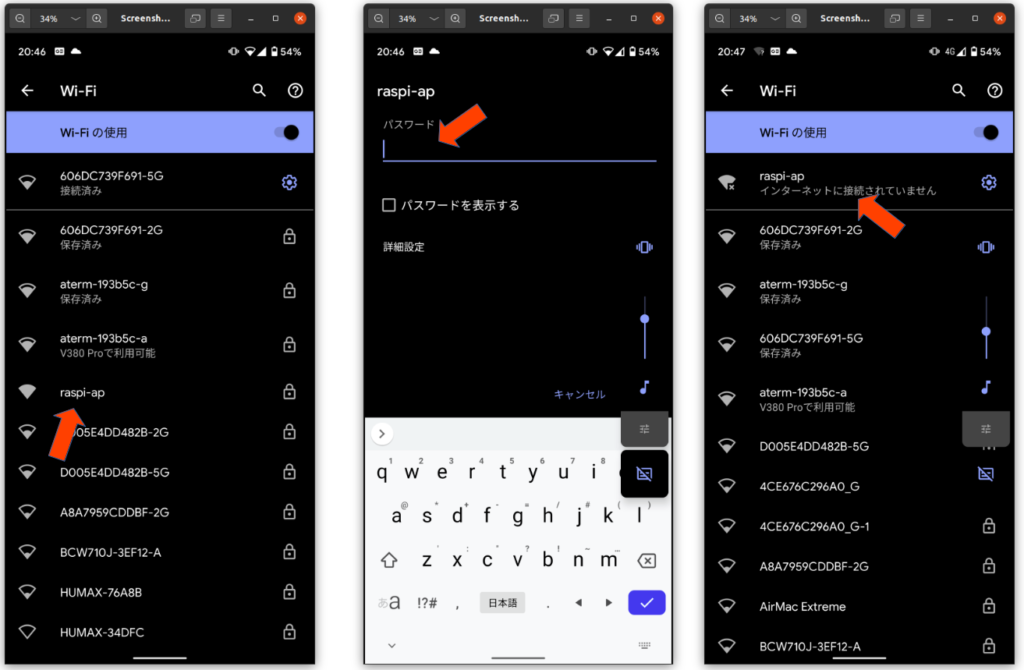
- 左: SSIDで指定した、”raspi-ap”を見つけている事が分かります。これを選択すると
- 中: アクセスポイントのパスワードを聞かれます。指定した、”12345678” を入力すると
- 右: アクセスポイントにつながった事が分かります。
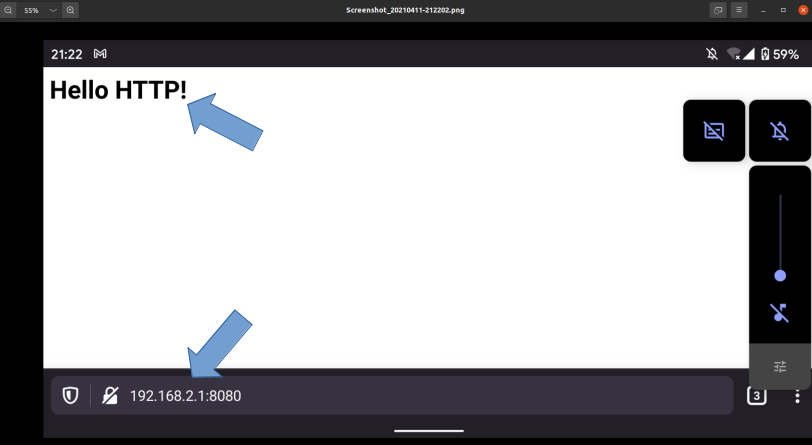
これではつながった実感がわかないので、”まずは、Hello HTTP(01)” で使用した HPにアクセスすると ”Hello HTTP”と表示するPythonプログラムを実行して見ましょう。使用するプログラムは以下の通り。
hello.py
from http.server import HTTPServer, SimpleHTTPRequestHandler

class MyHandler(SimpleHTTPRequestHandler):

    def do_GET(self):

        self.send_response(200)
        self.send_header('Content-type', "text/html")
        self.end_headers()
        self.wfile.write("<h1>Hello HTTP!</h1> \n".encode())

host = ''
port = 8080
httpd = HTTPServer((host, port), MyHandler)
print('serving at port', port)
httpd.serve_forever()
- このプログラムを、”hello.py”としてホームディレクトリに保存。
- ターミナルから、”python3 hello.py” と実行して下さい。
- スマホがAP接続している状態でブラウザを上げる。
- ブラウザのURL欄に、”192.168.2.1:8080”と入力。
- ブラウザに、”Hello HTTP”と表示されます。
最後に
長々と良く分からない事を説明してきました。結局何が凄いのって ”一つのWiFiでAP/STA接続の2つの接続を行うところ” です。具体的にどんな時に便利なのって聞かれたら、例えば、タイムラプスやって見ました は野外で写真撮影するのでRaspbeery PIに直接つなぐAP接続を使用しています。この様な場合い威力を発揮します。