まずは前回のHPをStreamingのみのコードに簡略化します。そのコードを元にUV4L、ソケット通信、P2P通信、WebRTC 各々の関係を理解して行きます。
HPのHTMLコードの簡略化
前回の最後で使用したRaspberry PIとのStreamingのHPのコードを以下の様に簡略化しました。
- ”remote”, “local”の2画面を”remote”のみにする。
- ”Pause” , “Mute”, “Fullscreen”, “Recording” ボタンを廃止。
- ”Call”、”Hangup” ボタンはそのまま残す。
- 画面サイズはwidth=”640″ height=”480″に固定。
- Advanced optionsで、”Trickle ICE”をtrueに固定。
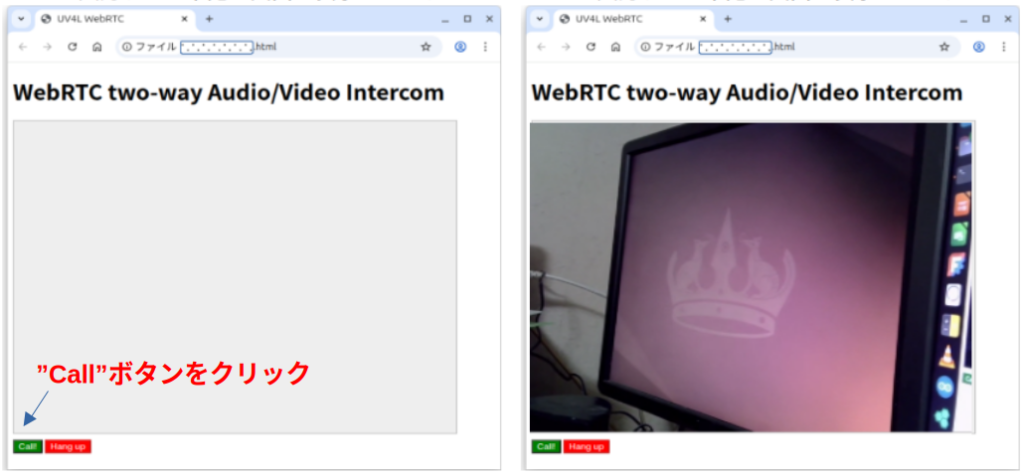
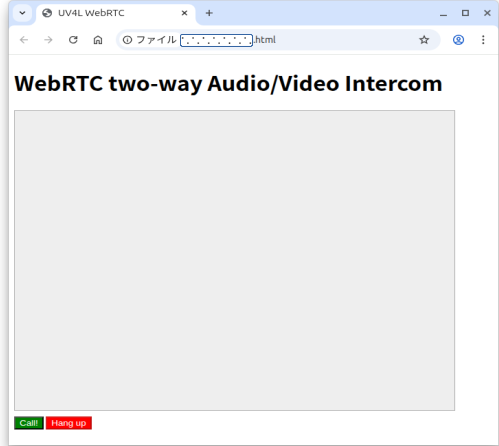
実行すると下記左の画面が表示されます。左下の”CALL”ボタンをクリックするとStreamingが開始。”Hang Up”ボタンをクリックでStreaming終了です。
<!DOCTYPE html>
<html>
    <head>
        <meta charset="UTF-8">
        <title>UV4L WebRTC</title>
        <script type="text/javascript">

            var ws = null;
            var pc;
            var audio_video_stream;
            var mediaConstraints = {
                optional: [],
                mandatory: {
                    OfferToReceiveAudio: true,
                    OfferToReceiveVideo: true
                }
            };
            var iceCandidates = [];

            function createPeerConnection() {
                try {
                    pc = new RTCPeerConnection();
                    pc.onicecandidate = onIceCandidate;
                    pc.ontrack = onTrack;
                    pc.onremovestream = onRemoteStreamRemoved;
                    console.log("peer connection successfully created!");
                } catch (e) {
                    console.error("createPeerConnection() failed");
                }
            }

            function onIceCandidate(event) {
                if (event.candidate && event.candidate.candidate) {
                    var candidate = {
                        sdpMLineIndex: event.candidate.sdpMLineIndex,
                        sdpMid: event.candidate.sdpMid,
                        candidate: event.candidate.candidate
                    };
                    var request = {
                        what: "addIceCandidate",
                        data: JSON.stringify(candidate)
                    };
                    ws.send(JSON.stringify(request));
                } else {
                    console.log("End of candidates.");
                }
            }

            function addIceCandidates() {
                iceCandidates.forEach(function (candidate) {
                    pc.addIceCandidate(candidate,
                        function () {
                            console.log("IceCandidate added: " + JSON.stringify(candidate));
                        },
                        function (error) {
                            console.error("addIceCandidate error: " + error);
                        }
                    );
                });
                iceCandidates = [];
            }

            function onTrack(event) {
                console.log("Remote track!");
                var remoteVideoElement = document.getElementById('remote-video');
                remoteVideoElement.srcObject = event.streams[0];
            }

            function onRemoteStreamRemoved(event) {
                var remoteVideoElement = document.getElementById('remote-video');
                remoteVideoElement.srcObject = null;
                remoteVideoElement.src = ''; // TODO: remove
            }

            function start() {
                if ("WebSocket" in window) {
                    document.getElementById("stop").disabled = false;
                    document.getElementById("start").disabled = true;
                    document.documentElement.style.cursor = 'wait';

                    var protocol = location.protocol === "https:" ? "wss:" : "ws:";
                    ws = new WebSocket(protocol + '//raspberrypi.local:8090/stream/webrtc');

                    ws.onopen = function () {
                        iceCandidates = [];
                        remoteDesc = false;
                        createPeerConnection();
                        var request = {
                            what: "call",
                            options: {
                                force_hw_vcodec: false,
                                vformat: "30",
                                trickle_ice: true
                            }
                        };
                        ws.send(JSON.stringify(request));
                        console.log("call(), request=" + JSON.stringify(request));
                    };

                    ws.onmessage = function (evt) {
                        var msg = JSON.parse(evt.data);
                        if (msg.what !== 'undefined') {
                            var what = msg.what;
                            var data = msg.data;
                        }
                        console.log("message =" + what);

                        switch (what) {
                            case "offer":
                                pc.setRemoteDescription(new RTCSessionDescription(JSON.parse(data)),
                                        function onRemoteSdpSuccess() {
                                            remoteDesc = true;
                                            addIceCandidates();
                                            console.log('onRemoteSdpSucces()');
                                            pc.createAnswer(function (sessionDescription) {
                                                pc.setLocalDescription(sessionDescription);
                                                var request = {
                                                    what: "answer",
                                                    data: JSON.stringify(sessionDescription)
                                                };
                                                ws.send(JSON.stringify(request));
                                                console.log(request);

                                            }, function (error) {
                                                alert("Failed to createAnswer: " + error);

                                            }, mediaConstraints);
                                        },
                                        function onRemoteSdpError(event) {
                                            alert('Failed to set remote description (unsupported codec on this browser?): ' + event);
                                            stop();
                                        }
                                );
                                break;

                            case "iceCandidate": // when trickle is enabled
                                if (!msg.data) {
                                    console.log("Ice Gathering Complete");
                                    break;
                                }
                                var elt = JSON.parse(msg.data);
                                let candidate = new RTCIceCandidate({sdpMLineIndex: elt.sdpMLineIndex, candidate: elt.candidate});
                                iceCandidates.push(candidate);
                                if (remoteDesc)
                                    addIceCandidates();
                                document.documentElement.style.cursor = 'default';
                                break;
                        }
                    };

                    ws.onclose = function (evt) {
                        if (pc) {
                            pc.close();
                            pc = null;
                        }
                        document.getElementById("stop").disabled = true;
                        document.getElementById("start").disabled = false;
                        document.documentElement.style.cursor = 'default';
                    };

                    ws.onerror = function (evt) {
                        alert("An error has occurred!");
                        ws.close();
                    };

                } else {
                    alert("Sorry, this browser does not support WebSockets.");
                }
            }

            function stop() {
                if (audio_video_stream) {
                    try {
                        if (audio_video_stream.getVideoTracks().length)
                            audio_video_stream.getVideoTracks()[0].stop();
                        if (audio_video_stream.getAudioTracks().length)
                            audio_video_stream.getAudioTracks()[0].stop();
                        audio_video_stream.stop(); // deprecated
                    } catch (e) {
                        for (var i = 0; i < audio_video_stream.getTracks().length; i++)
                            audio_video_stream.getTracks()[i].stop();
                    }
                    audio_video_stream = null;
                }
                document.getElementById('remote-video').srcObject = null;
                document.getElementById('remote-video').src = ''; // TODO; remove
                if (pc) {
                    pc.close();
                    pc = null;
                }
                if (ws) {
                    ws.close();
                    ws = null;
                }
                document.getElementById("stop").disabled = true;
                document.getElementById("start").disabled = false;
                document.documentElement.style.cursor = 'default';
            }

        </script>
        <style>
            video {
                background: #eee none repeat scroll 0 0;
                border: 1px solid #aaa;
            }
        </style>
    </head>
    <body>
        <h1><span>WebRTC two-way Audio/Video Intercom</span></h1>
        <video id="remote-video" autoplay="" width="640" height="480">
            Your browser does not support the video tag.
        </video><br>
        <button id="start" style="background-color: green; color: white" onclick="start();">Call!</button>
        <button disabled id="stop" style="background-color: red; color: white" onclick="stop();">Hang up</button>
    </body>
</html>
Index.htmlは何処?
ブラウザを上げてURL欄に”http://raspberrypi.local:8090”と入力すればUV4L Streaming ServerのHPが表示されるので
UV4LはWebサーバを持っている。HPのコード(多分”index.html”)が存在するはず。
それと今回のコードを入れ替えれば”http://raspberrypi.local:8090”アクセスで修正したHPが動作する。
という仮定の元にHPコードを探したのですが保管場所が見つかりません。多分コードの中に組み込まれている可能性が高いです。
そこで試しにブラウザから直接コードを読み込んでみたら問題無く起動しました。Webサーバ無しで。多分こんな感じで動いているのだと思います。

- 初期状態。Raspberry PIとNoteBookは同一のLANの中にいる。
- Raspberry PI側:
- UV4Lを立ち上げる
- UV4LにはWeb_Server、Signal_server、Streaming操作部の3つが有る。
- NoteBook側:
- ブラウザ(Firfox)を上げる
- ブラウザで今回のコードを読み込むと修正したHP画面が表示される
- Raspberry PI側:
- NoteBook側でHP左下の”CALL”ボタンをクリック
- ブラウザのコードがUV4LのSignal_ServerとWebsocketで接続。
- NoteBookとRaspberry PIの間でP2P接続に必要な情報を交換する。
- 情報が整うとP2Pが開通しStreamingが始まる
Web_Serverを介していませんがこの方法で問題なさそうなのでしばらくこの状態で進めます。
コードの説明
コードには下記の2つの動作が有ります。
start():Streamingの開始
stop():Streamingの終了
Streamingの開始
HP上の”CALL”ボタンをクリックするとstart()関数が実行されStreamingが始まります。Streaming開始までの流れは以下の様になっています。
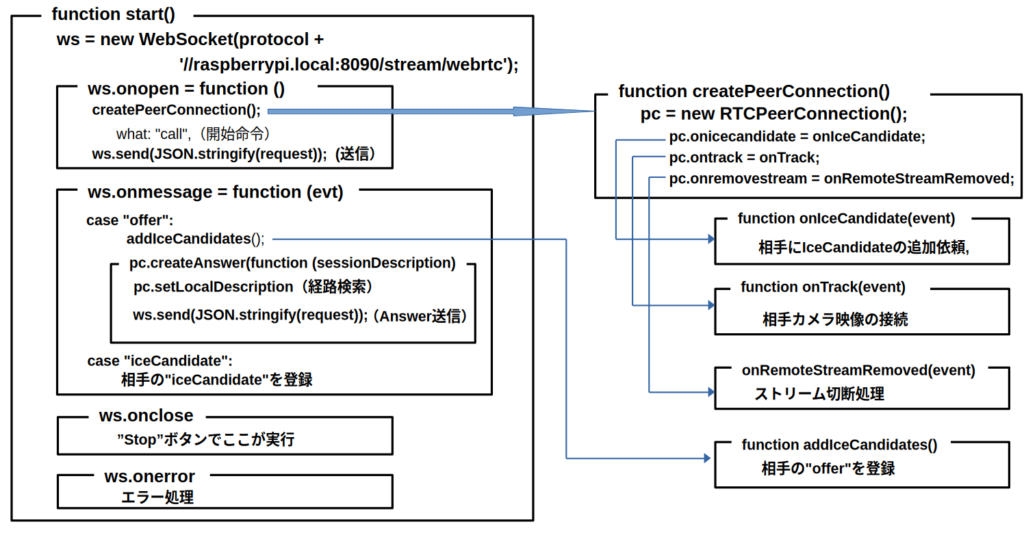
- HPの”CALL”ボタンをクリックすると”function start()”へ飛ぶ。
- ws = new WebSocket(protocol +’//raspberrypi.local:8090/stream/webrtc’);
UV4LのSignal_serverにwebsocketで接続。 - ws.onopen:Signal_serverと接続したらここが実行。
- createPeerConnection();:P2Pの準備を行う関数を実行
pc = new RTCPeerConnection(); P2P用インスタンスの作成
pc.onicecandidate = onIceCandidate; イベント関数宣言
pc.ontrack = onTrack; イベント関数の宣言
pc.onremovestream = onRemoteStreamRemoved; イベント関数の宣言- 各イベント関数の説明
- function onIceCandidate(event)
IceCandidateが見つかったら発動する関数。
相手にIceCandidateを送信し登録を依頼 - function onTrack(event)
P2Pの接続が完了した発動する関数。
画像データを接続する。 - onRemoteStreamRemoved(event)
Streamingが削除された時に発動する関数。
- function onIceCandidate(event)
- 各イベント関数の説明
- ws.send(JSON.stringify(request));
続いて”call”コマンドを送信して相手にP2Pの準備を依頼。
- createPeerConnection();:P2Pの準備を行う関数を実行
- ws.onmessage = function (evt) 相手からのメッセージを処理する関数。
- case “offer”: 相手メッセージが”offer”の場合
addIceCandidates(); 受信したIceCandidateを登録
pc.createAnswer(function (session ここで送信用IceCandidate(Answer)を作成
pc.setLocalDescription IceCandidateを検索
ws.send(JSON.stringify ここで相手に送信 - case “iceCandidate”: 相手メッセージが”iceCandidate”の場合
”iceCandidate”の登録
- case “offer”: 相手メッセージが”offer”の場合
- ws.onclose Signal_serverが切断されると実行。
- ws.onerror Signal_serverとの接続でエラーが発生した時に実行。
createPeerConnection()でP2Pインスタンスを作り相手に”call”を送信してP2Pの準備スタート。
その後相手のSignal_serverと通信(”offer”、”iceCandidate”)P2Pの準備を行う
P2P接続後画像データを接続してStreaming開始
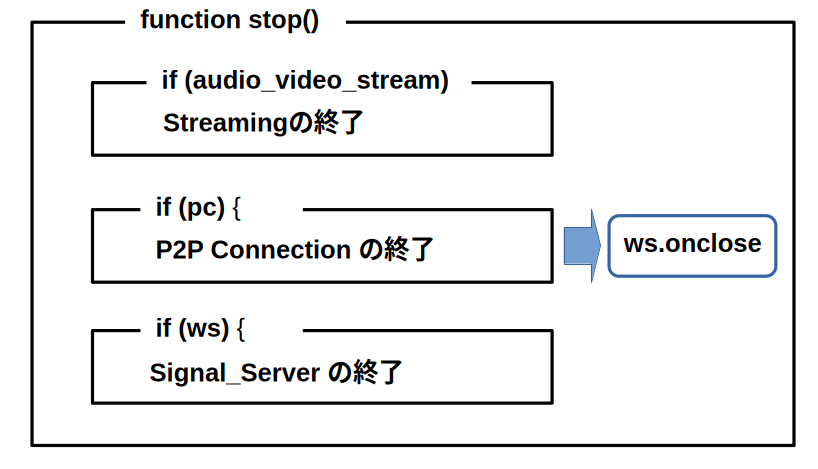
Streamingの終了
HP上の”Hang up”ボタンをクリックするとstopt()関数が実行されStreamingが終了します。
stopt()関数はStreaming、P2P、Signal_serverを順に終了します。
UV4LとWebRTCの違いは
UV4L:User space Video4Linux。 WebRTC:Web Real-Time Communication。
どちらもP2PでStreamingを行うアプリなのですが両者を比較すると
| 項目 | UV4L | WebRTC |
|---|---|---|
| ブラウザ | 無くてもOK | 必要 |
| MediaDevice使用許可 | 許可無しでOK | 必要 |
| 追加機能 | Web,Signalサーバ等 | ? |
くらいでしょうか。ちょっとUV4L寄り気味ですがUV4Lの方がインターフォンには向いていると思います。
今回インストールしたのは、uv4l、 uv4l-webrtc、 uv4l-uvc の3つ。
- uv4l: Framework Core
- uv4l-webrtc: WebRTC用のプラグイン
- uv4l-uvc: USBカメラ用のプラグイン
UV4Lに関する資料ですが下記を見つけました。
P2P通信にはSignal_Serveサーバが必要
P2Pとはサーバを介さずに端末同士で直接データを通信する技術ですが、P2Pを確立する為にはお互いの情報を交換する必要が有ります。この情報を交換する為にSignal_Serverが必要になります。今回のコードでは”raspberrypi.local:8090/stream/webrtc”がそれで接続手段は”Websocket”です。
互いに交換するデータは主に下記の2つ。
- Session Description Protocol (SDP)は以下の情報を含んでいます。
- 通信するメディアの種類(音声、映像)、メディアの形式(コーデック)
- IPアドレス、ポート番号
- 暗号化の鍵 等
- ICE Candidate
- P2P通信を行う際に使われる通信経路の候補
- どのような通信経路が使えるかは、お互いのネットワーク環境に依存。
- 通信相互で経路の候補を挙げ、通信が繋がった時にその経路を使う。
UV4LのSignal_Serverにはのアクセスフォーマットが有ります。WebRTC signalingによるとフォーマットは下記。
{
   what: "call",
   options: {
      force_hw_vcodec: true,
      vformat: 30,
      trickle_ice: true
   }
}
- what:リクエストの内容
- options: 設定パラメータ。
- force_hw_vcodec: ビデオコーデックの有無
- vformat: 画面の解像度
- trickle_ice: 候補の送信方法
true :見つかったら直ぐに送信。
false:まとめて送信
Signal_Serverの役目はP2Pが開通するまでで、開通するとP2PでStreamingを行います。Signal_ServerはStreamingに全く関与していません。
プログラムの実行
最後にプログラムを実行までの手順をおさらいします。
- Raspberry PI側:
- UV4Lの起動が必要です。
- 前回の ”UV4Lを使う(1)” 通りにセットアップしていればRaspberry PIの起動と共にUV4Lも起動します。
- PC側:
- 今回の修正したコードをPCに保存。
- ブラウザ(今回はFirefox)で読み込む。(ファイルをクリック)。
- 実行結果:
- ”Call”ボタン:Streamingの開始。
- ”Hang Up”ボタン:Streamingの終了。
次は
P2P、Signal_server、UV4Lの関係が大まかに理解出来ました。相手側からの映像と音声のStreamingは出来る様になりました。こちら側から音声をRaspberry PIに送る事が出来れば立派なインターフォンになります。次回はこれに挑戦します。