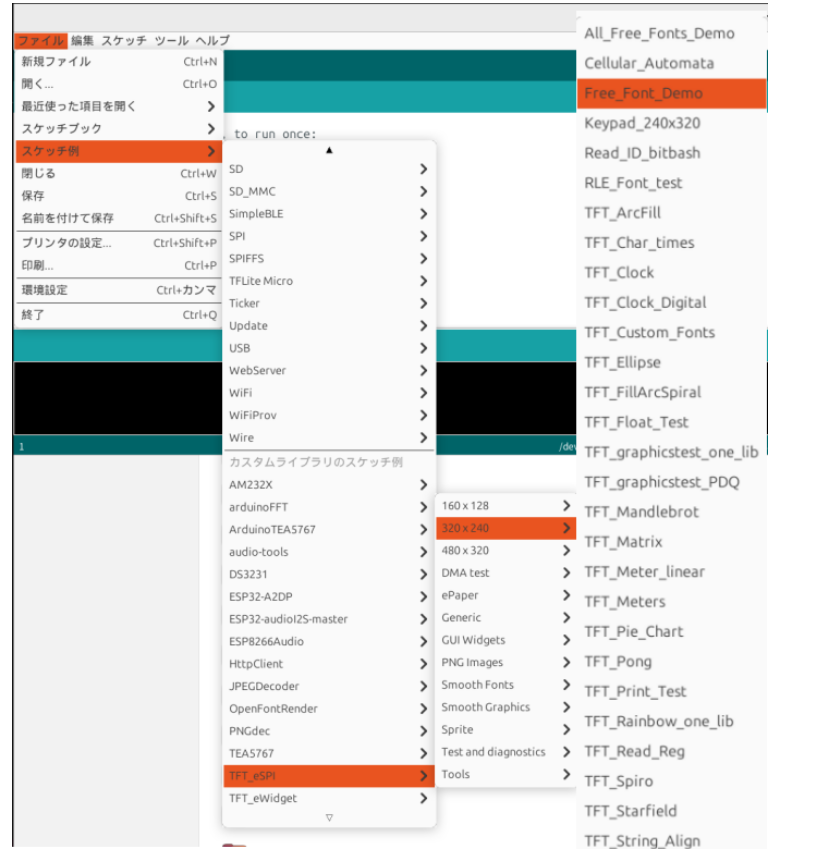
スケッチ例のサンプルです。場所はファイルー>スケッチ例ー>TFT_eSPIー>320x240ー>Free_Font_Demoです。
出だしが重要
下記は出だしの数行ですが重要な部分です。
Free_Font_Demo.ino
#########################################################################
###### DON'T FORGET TO UPDATE THE User_Setup.h FILE IN THE LIBRARY ######
#########################################################################
*/

#include "SPI.h"
#include "TFT_eSPI.h"

#include "Free_Fonts.h" // Include the header file attached to this sketch

// Use hardware SPI
TFT_eSPI tft = TFT_eSPI();

unsigned long drawTime = 0;

void setup(void) {

  tft.begin();

  tft.setRotation(1);

}

void loop() {

  int xpos =  0;
  int ypos = 40;

  // >>>>>>>>>>>>>>>>>>>>>>>>>>>>>>>>>>>>>>>>>>>>>>>>>>>>>>>>>>>>>>>>>>>>>>>>>>>>>>>>>
  // Select different fonts to draw on screen using the print class
  // >>>>>>>>>>>>>>>>>>>>>>>>>>>>>>>>>>>>>>>>>>>>>>>>>>>>>>>>>>>>>>>>>>>>>>>>>>>>>>>>>

  header("Using print() method", TFT_NAVY);
      .
      .
      .
    途中省略
      .
      .
// Print the header for a display screen
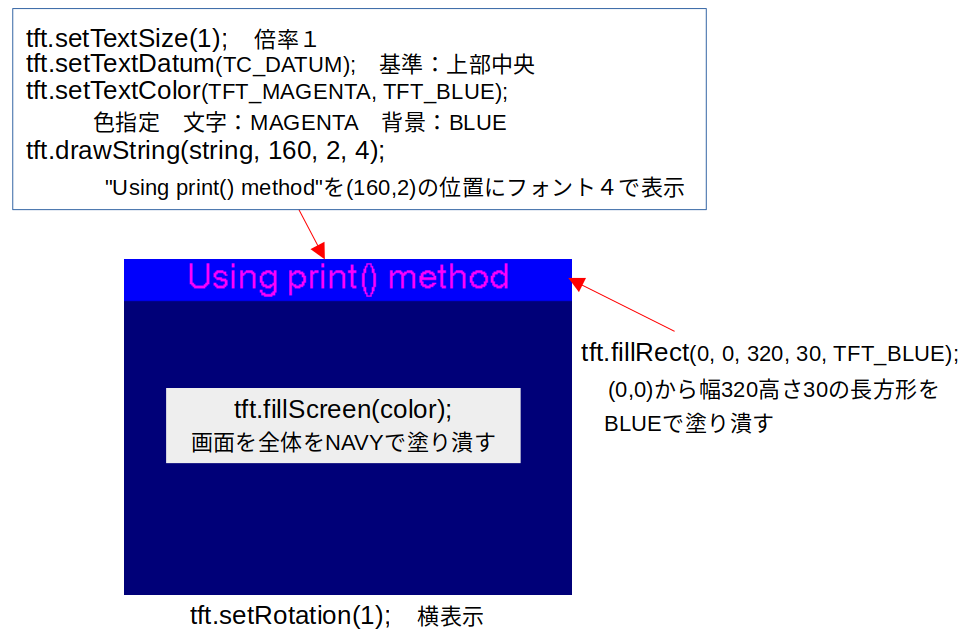
void header(const char *string, uint16_t color)
{
tft.fillScreen(color);
tft.setTextSize(1);
tft.setTextColor(TFT_MAGENTA, TFT_BLUE);
tft.fillRect(0, 0, 320, 30, TFT_BLUE);
tft.setTextDatum(TC_DATUM);
tft.drawString(string, 160, 2, 4); // Font 4 for fast drawing with background
}
- #include “SPI.h”、#include “TFT_eSPI.h”。 TFT_eSPI tft = TFT_eSPI();の3行は必ず設定して下さい。
- tft.begin(); ここでUser_Setup.hに従って初期化が行われます。
- tft.setRotation(1);
- 画面の表示モードを指定します。
- 引数は 0,1,2,3の4個。引数の値により画面の表示が下記の様に設定されます。
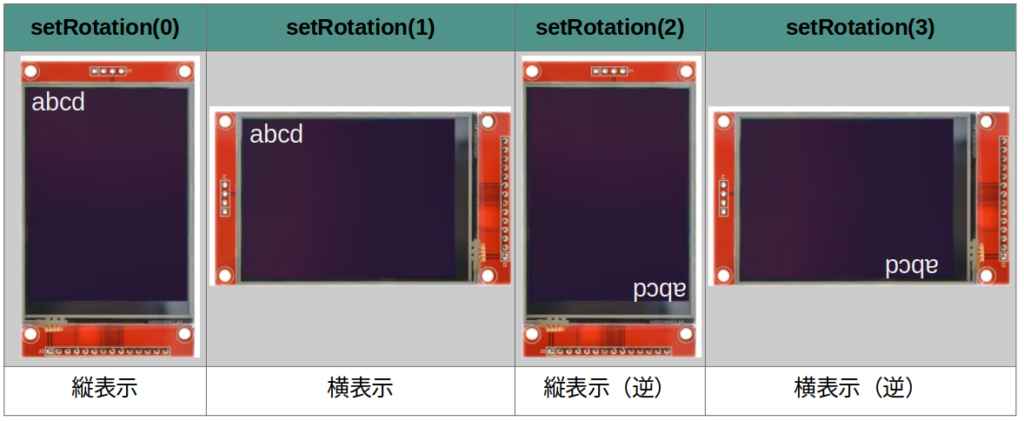
- ここでは tft.setRotation(1); としているので 横表示の設定となります。
- void header(const char *string, uint16_t color)に移って
- tft.fillScreen(color); 画面全体を指定した色で塗り潰す。
- TFT_eSPIの色は16ビット(R:5/G:6/B:5)カラーで指定します。
- 色は予め下記の24色が登録されています。
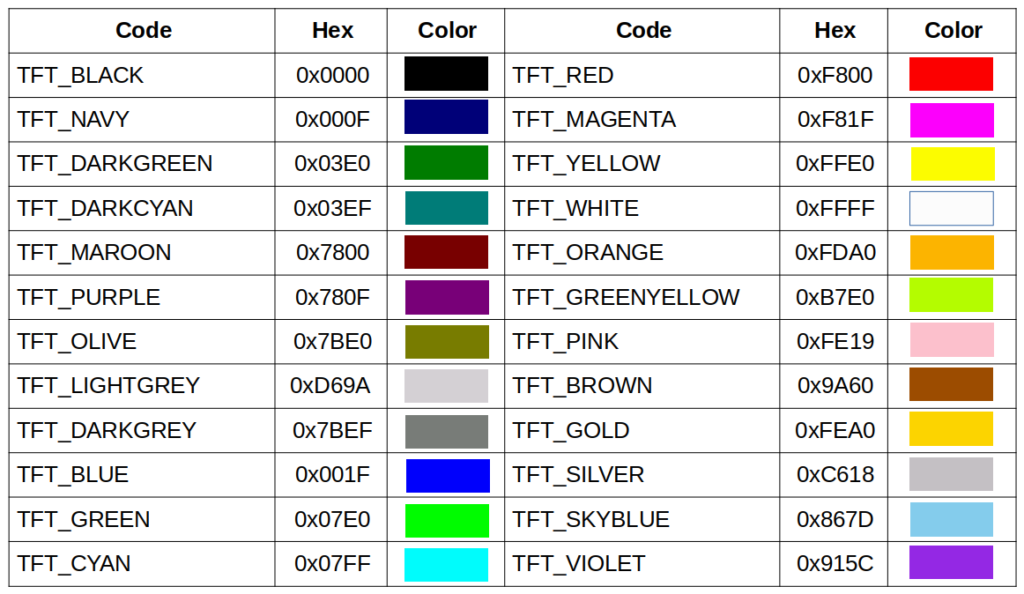
- これ以外の色も引数に指定する事により表示出来ます。
- tft.setTextSize(1);
- フォントの倍率を指定する関数。
- 引数は1から7までの7つ。等倍から7倍までフォントを拡大出来ます。
- ここでは引数が1なので等倍。
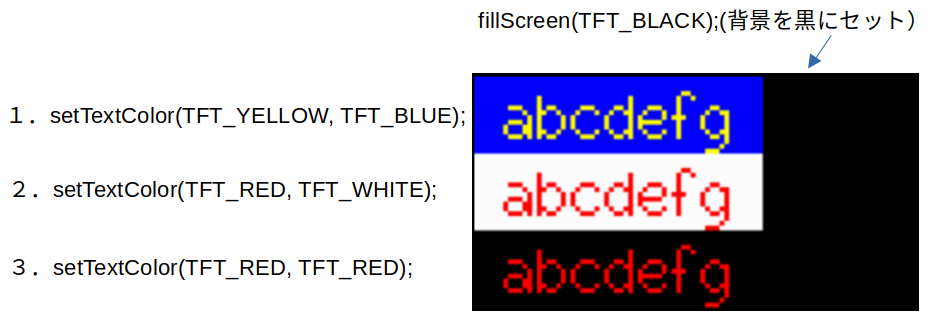
- tft.setTextColor(TFT_MAGENTA, TFT_BLUE);
- 文字とその背景の色を指定する。
- 最初の引数が文字、次が背景です。色は16ビットで指定。
- 文字と背景を同じ色で指定すると背景が透明扱いになります。
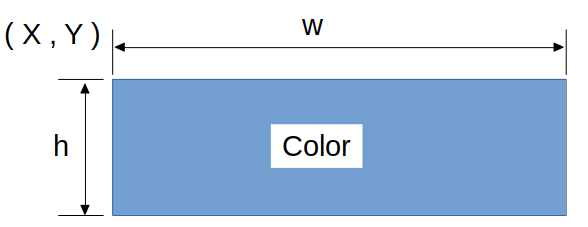
- tft.fillRect(0, 0, 320, 30, TFT_BLUE);
- 指定した長方形の範囲を塗り潰す関数。
- fillRect(X, Y, w, h, Color); と指定すると以下の様になります。
- tft.fillRect(0, 0, 320, 30, TFT_BLUE); 座標(0,0)から幅320、高さ30をBLUEで塗り潰された長方形
- tft.setTextDatum(TC_DATUM);
- 文字列を表示する開始位置を引数で指定します。12箇所の指定が可能。
- 引数と開始位置の関係は以下の通り。
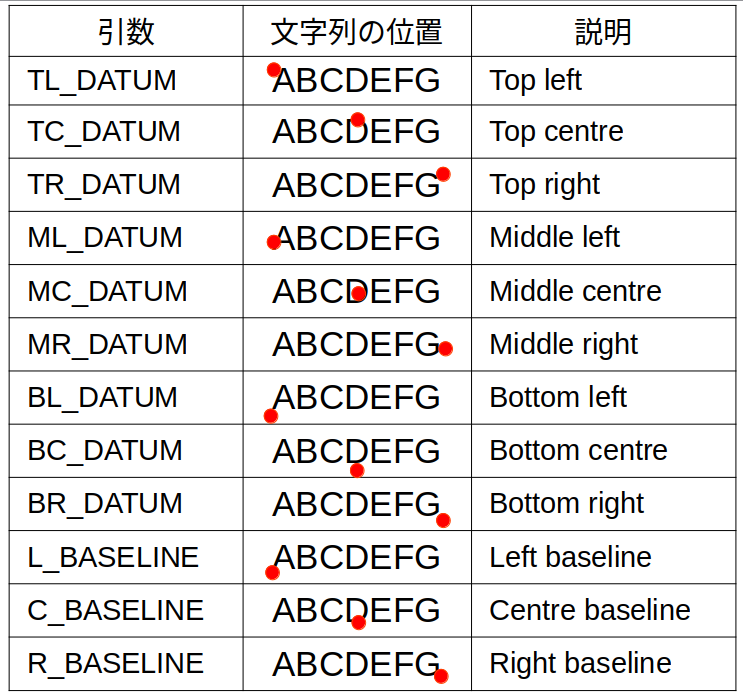
- tft.setTextDatum(TC_DATUM); Top center 上部中央
- tft.drawString(string, 160, 2, 4); 文字列を表示する関数。
- 引数は 文字列、x座標、y座標、文字コード です。
- デフォルトで6種類のフォントを持っていてそれらを文字コードで指定します。
- 文字コードは1,2,4,6,7,8の6個。参照ディスプレイに文字を表示する(その2)。
- これらのフォントは /Arduino/libraries/TFT_eSPI/Fonts/に有ります。
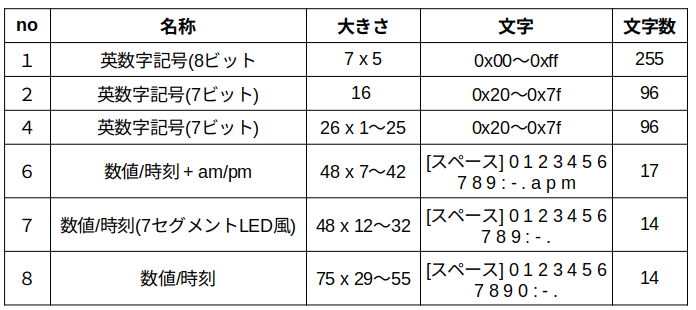
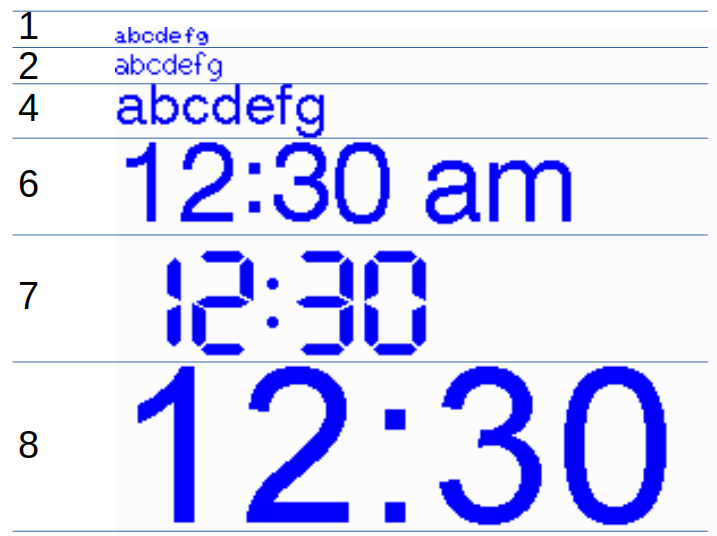
- 各々のコードの表示サンプルは以下の通り
- 指定サイズ以外のフォントは文字コードとtft.setTextSize();を併用してフォントの大きさを調整します。
- tft.fillScreen(color); 画面全体を指定した色で塗り潰す。
- 以上よりここまで実行するとLCDの画面は以下の様になります。
次はprint(), println()の説明
下記のコードはprint(), println()のデモ部分です。Arduinoで使用するprint(), println()と同じ様な動作をします。
Free_Font_Demo.ino
void loop() {

  int xpos =  0;
  int ypos = 40;

  // >>>>>>>>>>>>>>>>>>>>>>>>>>>>>>>>>>>>>>>>>>>>>>>>>>>>>>>>>>>>>>>>>>>>>>>>>>>>>>>>>
  // Select different fonts to draw on screen using the print class
  // >>>>>>>>>>>>>>>>>>>>>>>>>>>>>>>>>>>>>>>>>>>>>>>>>>>>>>>>>>>>>>>>>>>>>>>>>>>>>>>>>

  header("Using print() method", TFT_NAVY);

  // For comaptibility with Adafruit_GFX library the text background is not plotted when using the print class
  // even if we specify it.
  tft.setTextColor(TFT_YELLOW);
  tft.setCursor(xpos, ypos);    // Set cursor near top left corner of screen

  tft.setFreeFont(TT1);     // Select the orginal small TomThumb font
  tft.println();             // Move cursor down a line
  tft.print("The really tiny TomThumb font");    // Print the font name onto the TFT screen
  tft.println();
  tft.println();

  tft.setFreeFont(FSB9);   // Select Free Serif 9 point font, could use:
  // tft.setFreeFont(&FreeSerif9pt7b);
  tft.println();          // Free fonts plot with the baseline (imaginary line the letter A would sit on)
  // as the datum, so we must move the cursor down a line from the 0,0 position
  tft.print("Serif Bold 9pt");  // Print the font name onto the TFT screen

  tft.setFreeFont(FSB12);       // Select Free Serif 12 point font
  tft.println();                // Move cursor down a line
  tft.print("Serif Bold 12pt"); // Print the font name onto the TFT screen

  tft.setFreeFont(FSB18);       // Select Free Serif 12 point font
  tft.println();                // Move cursor down a line
  tft.print("Serif Bold 18pt"); // Print the font name onto the TFT screen

  tft.setFreeFont(FSB24);       // Select Free Serif 24 point font
  tft.println();                // Move cursor down a line
  tft.print("Serif Bold 24pt"); // Print the font name onto the TFT screen


  delay(4000);
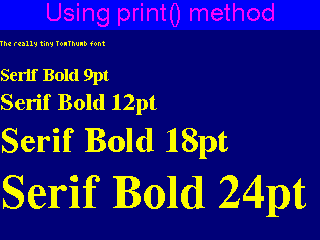
この部分を実行するとLCDの画面は以下の様になります。
tft.setTextColor(TFT_YELLOW);- 文字の色のみ指定した(引数が1つの)場合、背景も同色となる。(背景は透明扱いになる)
- tft.setCursor(xpos, ypos);
- 表示位置を指定する関数。
- 位置は注釈に// Set cursor near top left corner of screenと有る様にトップ左上。
- tft.setFreeFont(TT1);
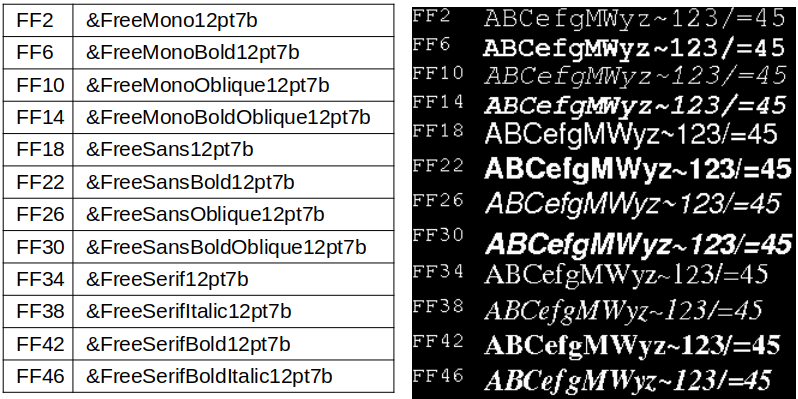
- デフォルトの6種類のフォント以外のフォントを指定する時に使う関数。
- TFT_eSPIにはAdafruit_GFX形式のFreeフォントが既に登録されています。
- 登録されたフォントのリストが、”Free_Fonts.h”です。
- 実際のファイルは/Arduino/libraries/TFT_eSPI/Fonts/GFXFF/に有ります。
- コンパイル時に引数のフォントがここから読み込まれる様です。
tft.println();- Arduinoと同じ改行を伴った文字列表示関数。
- tft.println();はその時点で使用しているフォントの高さに合わせて改行します。
- 72行から77行まで
- 72行:文字黄色、背景透明に設定
- 73行:ここでカーソル(表示)の位置をx:0, y:40に指定
- 75行:フォントをTT1に設定
- 76行:ここで改行
- 77行:”The really tiny TomThumb font”を表示
- tft.setCursor(xpos, ypos);の位置(x:0.y:40)を指定しているが76行で改行を実行
- よって、(x:0.y:40)からフォント文字の高さ改行した位置に表示されている。
tft.print();- Arduinoと同じ改行しないコマンド。
- 以降フォントサイズを変更して文字列を表示
次はdrawString()の説明
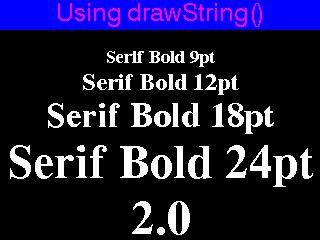
次はdrawString()の説明。対象のコードと実行結果は以下の通り
Free_Font_Demo.ino
  // >>>>>>>>>>>>>>>>>>>>>>>>>>>>>>>>>>>>>>>>>>>>>>>>>>>>>>>>>>>>>>>>>>>>>>>>>>>>>>>>>
  // Now use drawString() so we can set font background colours and the datum
  // >>>>>>>>>>>>>>>>>>>>>>>>>>>>>>>>>>>>>>>>>>>>>>>>>>>>>>>>>>>>>>>>>>>>>>>>>>>>>>>>>

  header("Using drawString()", TFT_BLACK);

  tft.setTextColor(TFT_WHITE, TFT_BLACK);

  tft.setTextDatum(TC_DATUM); // Centre text on x,y position

  xpos = tft.width() / 2; // Half the screen width
  ypos = 50;

  tft.setFreeFont(FSB9);                              // Select the font
  tft.drawString("Serif Bold 9pt", xpos, ypos, GFXFF);  // Draw the text string in the selected GFX free font
  ypos += tft.fontHeight(GFXFF);                      // Get the font height and move ypos down

  tft.setFreeFont(FSB12);
  tft.drawString("Serif Bold 12pt", xpos, ypos, GFXFF);
  ypos += tft.fontHeight(GFXFF);

  tft.setFreeFont(FSB18);
  tft.drawString("Serif Bold 18pt", xpos, ypos, GFXFF);
  ypos += tft.fontHeight(GFXFF);

  tft.setFreeFont(FSB24);
  tft.drawString("Serif Bold 24pt", xpos, ypos, GFXFF);
  ypos += tft.fontHeight(GFXFF);

  // Set text padding to 100 pixels wide area to over-write old values on screen
  tft.setTextPadding(100);
  for (int i = 0; i <= 20; i++) {
    tft.drawFloat(i / 10.0, 1, xpos, ypos, GFXFF);
    delay (200);
  }

  delay(4000);
tft.width()- その時点での表示モードに対する水平方向の解像度を返す関数。
- 垂直方向の解像度を返す関数は tft.height()
tft.drawString("Serif Bold 9pt", xpos, ypos, GFXFF);- 文字列を指定した位置に表示する関数ですがFree_Fontの場合最後の引数が
GFXFF(1)となる。
- 文字列を指定した位置に表示する関数ですがFree_Fontの場合最後の引数が
- tft.fontHeight(GFXFF);
- 引数で指定されたフォントの高さを返す関数。
- drawString()関数は改行の機能は無い。この関数で文字高さを獲て改行時に使用する。
- tft.setTextPadding(100);
- 現在使用しているフォントの高さと引数で指定した幅の領域消去。
- 直前に書かれた文字を消す場合に使用。
- tft.drawFloat(i / 10.0, 1, xpos, ypos, GFXFF);
- 浮動小数を表示する関数
- 引数は 浮動少数、少数の桁数、x座標、y座標、文字コード
- 少数の桁は7桁まで
- ここでは
- 画面を黒塗り
- 文字を白、背景を黒に設定
- Xの位置を画面水平方向の半分。Yを50に設定
- フォントを9,12,18,24と変更し、その都度高さを求めて改行
- 最後に少数をPaddingを用いて表示
この後は
同じ様なdrawString()のデモと ft.setTextDatum(); 関数(表示位置)の説明デモが続きます。
最後に
最後に登録されているFree_Font(12ドット)を表示して見ました。
登録されていないフォントでも登録すれば使用できる様です。
次回は、KeyPad_240x320.ino を説明する予定です。