今回はESP32でメールを送信するプログラムです。今回はGoogleのメールサーバーを使ってESP32からメールを送る事にします。
メールアカウントの取得
以前Googleはユーザー名とパスワードのみで アカウントにサインイン出来たのですが最近セキュリティーの関係でそれが出来なくなっています。よってユーザーが Gmail を使用するには、アプリ パスワードを使用する必要があります。ここは注意点。
”esp32 mail client”で検索すると幾つかHPがリストされますが今回は、”ESP32 Send Emails using an SMTP Server: HTML, Text, and Attachments (Arduino IDE)”にしたがってGoogleのアカウントを取って行きます。
申請時に以下を注意して下さい。
- 2段階認証にする事。
- 2段階認証後に”App Passwords”と言う欄が追加される。
- 指示通り進めて行くと、Password が作製されます。
- この、Password は後でメールを送信する時に使いますのでメモって下さい。
この件はリンク先のページ、この辺で説明されています。

以降メールの送信方法が説明されています。ただ残念な事にここでは資料を添付して送信する方法の説明が有りません。
SDカードに保存されているデータの添付方法
ここ ー> ”motion-triggered-image-camera-diy-10/diy-e10-p2/diy-e10-p2.ino” にSDカードに保存されたデータを添付してメールを送るソフトが有りました。必要な部分のみ書き出すと、
mail
#include <ESP32_MailClient.h>

#define SMTP_HOST "smtp.gmail.com"
#define SMTP_PORT 465

/* The sign in credentials */
#define AUTHOR_EMAIL "aaaaaaaa@gmail.com"
#define AUTHOR_PASSWORD "xxxxxxxxxxxx"

/* Recipient's email*/
#define RECIPIENT_EMAIL "bbbbbbbbbbbbbbb"

/* The SMTP Session object used for Email sending */
SMTPData smtpData;

void setup()
{
    ..................
    .................

    MailClient.sdBegin(sd_sck,sd_miso,sd_mosi,sd_ss);  //SCK, MISO, MOSI, SS

    ..................
    .................
}

void send_mail()
{
    //send email
    Serial.println("Sending email...");

    //Set the Email host, port, account and password
    smtpData.setLogin("smtp.gmail.com", 465, AUTHOR_EMAIL, AUTHOR_PASSWORD);

    //Set the sender name and Email
    smtpData.setSender("ESP32-CAM", AUTHOR_EMAIL);

    //Set Email priority or importance High, Normal, Low or 1 to 5 (1 is highest)
    smtpData.setPriority("Normal");

    //Set the subject
    smtpData.setSubject("Take a picture - ESP32-CAM");

    //Set the message - normal text or html format
    smtpData.setMessage("Image attached.", false);

    //Add recipients, can add more than one recipient
    smtpData.addRecipient(RECIPIENT_EMAIL);

    //Add attach files from SD card
    smtpData.addAttachFile("/data.jpg");

    //Set the storage types to read the attach files (SD is default)
    smtpData.setFileStorageType(MailClientStorageType::SD);

    smtpData.setSendCallback(sendCallback);

    //Start sending Email, can be set callback function to track the status
    if (!MailClient.sendMail(smtpData))
        Serial.println("Error sending Email, " + MailClient.smtpErrorReason());

    //Clear all data from Email object to free memory
    smtpData.empty();
}

/* Callback function to get the Email sending status */
void sendCallback(SendStatus msg)
{
    //Print the current status
    Serial.println(msg.info());

    //Do something when complete
    if (msg.success())
    {
        Serial.println("----------------");
    }
}
- 1行:#include
- メール関係のヘッダー
- 3行:#define SMTP_HOST ”smtp.gmail.com”
- Googleの場合のSMTPサーバーです。
- 4行:#define SMTP_PORT 465
- ポート番号を指定します。 今回は465を指定
- 7行:#define AUTHOR_EMAIL “aaaaaaaa@gmail.com”
- ここに今回使用するメールアドレス(先程新たにアカウントを取ったもの)を指定します。
- 8行:#define AUTHOR_PASSWORD “xxxxxxxxxxxx”
- ここに、”App Passwords”で得たパスワードを入力します。
- 11行:#define RECIPIENT_EMAIL “bbbbbbbbbbbbbbb”
- ここは、送り先のアドレスです。
- 14行:SMTPData smtpData;
- オブジェクトの宣言
- 21行:MailClient.sdBegin(sd_sck,sd_miso,sd_mosi,sd_ss); //SCK, MISO, MOSI, SS
- SDカードに保存したファイルを添付する為にこれを実行します。
- 27行:void send_mail() メールを送る関数
- 33行:Email host, port, account and passwordを設定
- 36行:送り主の名前とメールアドレスの設定
- 39行:優先順位の設定。ここでは、”Normal”に設定
- 42行:メールの題名の設定
- 45行:メール本文の設定。
- 第二引数
- true: 第一引数が、HTML 表記
- false: 第一引数が 平文
- 第二引数
- 48行:送り先のメールアドレス。
- 51行:これで、SDカードに保存されたファイルを添付出来ます。
- 添付するファールを引数に指定。
- 添付するファイルはテキストでもイメージでもOK。
- 追加で他のファイルを添付したい時はもう一度この関数を実行する。
- 54行:ストレージタイプを設定する。
- 今回はSDカードなので、SDと指定。
- 56行:コールバック関数の指定
- コールバック関数は送信の経過を表示します。
- 59行:メールの送信
- 63行:関数の廃止
- 67行:コールバック関数。
- 通信の経過を表示します。
サンプルプログラム
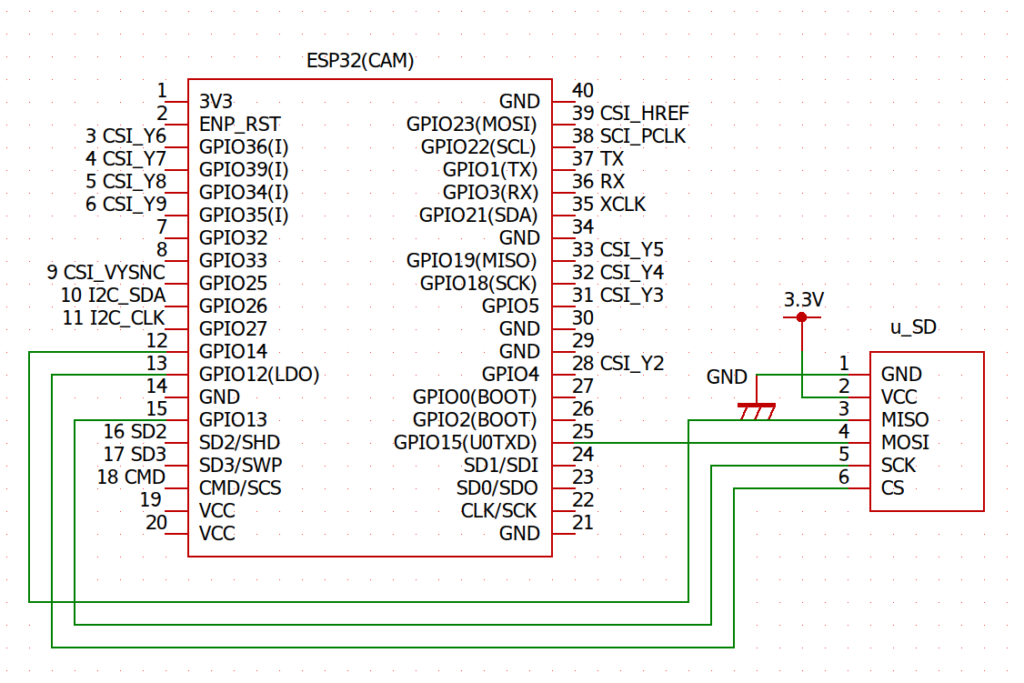
今回はSDカードに保存されたファイルを添付するのでESP32に以下の様にSDカードソケットを配線しました。

送信サンプルプログラム。
mail.ino
#include "Arduino.h"
#include "SD.h"
#include "FS.h"
#include <ESP32_MailClient.h>

#include <WiFi.h>

// Pin definition for SD Card
#define sd_sck  13
#define sd_mosi 15
#define sd_ss   12
#define sd_miso 14

const char *SSID = "your SSID";
const char *PASSWORD = "your Password";

#define SMTP_HOST "smtp.gmail.com"
#define SMTP_PORT 465

/* The sign in credentials */
#define AUTHOR_EMAIL "aaaaaaaa@gmail.com"
#define AUTHOR_PASSWORD "xxxxxxxxxx"

/* Recipient's email*/
#define RECIPIENT_EMAIL "bbbbbbbbbb"

/* The SMTP Session object used for Email sending */
SMTPData smtpData;

void setup()
{
    Serial.begin(115200);
    delay(100);

    Serial.println("Connecting to WiFi");
    WiFi.disconnect(true);
    WiFi.softAPdisconnect(true);
    delay(500);

    WiFi.mode(WIFI_STA);
    WiFi.begin(SSID, PASSWORD);
    delay(1000);

    // Try forever
    while (WiFi.status() != WL_CONNECTED)
    {
        Serial.println("...Connecting to WiFi");
        delay(1000);
    }
    Serial.println("Connected");
    Serial.println(SSID);
    Serial.print("IP address: ");
    Serial.println(WiFi.localIP());

    SPI.begin(sd_sck, sd_miso, sd_mosi, sd_ss);
    SD.begin(sd_ss);

    send_mail();

}

void loop()
{

}

void send_mail()
{
    //send email
    Serial.println("Sending email...");
    //Set the Email host, port, account and password
    smtpData.setLogin("smtp.gmail.com", 465, AUTHOR_EMAIL, AUTHOR_PASSWORD);

    //Set the sender name and Email
    smtpData.setSender("Mail-Test", AUTHOR_EMAIL);

    //Set Email priority or importance High, Normal, Low or 1 to 5 (1 is highest)
    smtpData.setPriority("Normal");

    //Set the subject
    smtpData.setSubject("Mail Test");

    //Set the message - normal text or html format
    smtpData.setMessage("Send Mail.", false);

    //Add recipients, can add more than one recipient
    smtpData.addRecipient(RECIPIENT_EMAIL);

    //Add attach files from SD card
    smtpData.addAttachFile("/data.jpg");

    //Set the storage types to read the attach files (SD is default)
    smtpData.setFileStorageType(MailClientStorageType::SD);

    smtpData.setSendCallback(sendCallback);

    //Start sending Email, can be set callback function to track the status
    if (!MailClient.sendMail(smtpData))
        Serial.println("Error sending Email, " + MailClient.smtpErrorReason());

    //Clear all data from Email object to free memory
    smtpData.empty();
}

/* Callback function to get the Email sending status */
void sendCallback(SendStatus msg)
{
    //Print the current status
    Serial.println(msg.info());

    //Do something when complete
    if (msg.success())
    {
        Serial.println("----------------");
    }
}
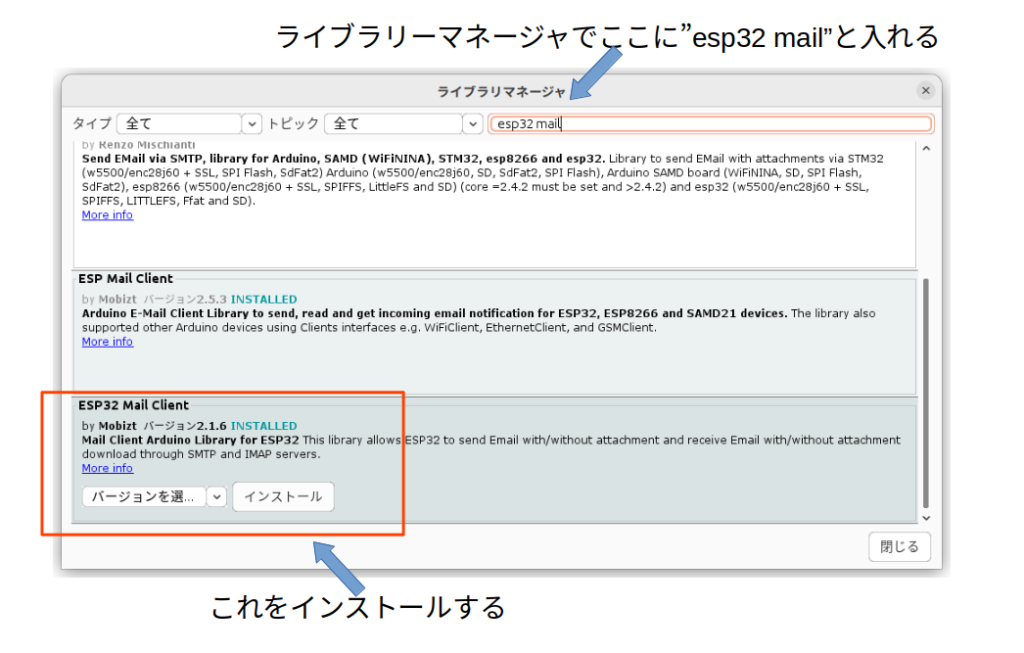
コンパイルする前にメール関係のライブラリーを追加します。Arduino IDEで ツール ー> ライブラリーの管理 と進むと下記の画面になります。ここで検索欄に、” esp32 mail”と入れると、”ESP32 Mail Client”が表示されます。これをインストールします。

後はコンパイルして実行して下さい。添付書類付きでメールが送れたと思います。